Hardhat以太坊开发框架
- DeCert.me
- 发布于 2025-12-14 23:33
- 阅读 3328
Hardhat 是一个专业的以太坊开发环境,提供灵活且易于使用的工具链,可以轻松地编写、测试和部署智能合约。Hardhat 支持 JavaScript/TypeScript 和 Solidity 两种测试方式。
Hardhat 核心特性:
- 🚀 更快的编译和测试:采用新的 EDR (Ethereum Development Runtime)
- ✍️ Solidity 测试:现在可以用 Solidity 编写测试(类似 Foundry,Hardhat 3 新特性)
- 🔧 强大的调试:内置调试器和
console.log()支持 - 🌐 Hardhat Network:为开发优化的本地以太坊网络
在本文中,我们将介绍:
- 创建及配置 Hardhat 项目
- 编写智能合约
- 使用 Solidity 编写测试
- 使用
console.log()调试 Solidity - 部署合约
- 代码开源验证
本文参考代码在:https://github.com/lbc-team/hello_hardhat
创建及配置 Hardhat 项目
Hardhat 构建在 Node.js 之上,使用 Hardhat 要求先安装 Node.js (>= 22.0),环境准备可以参考这里。
先创建项目目录:
mkdir hardhat-tutorial
cd hardhat-tutorial
初始化 Hardhat 项目:
npx hardhat --initHardhat 3 提供了多种项目模板:
888    888                      888 888               888
888    888                      888 888               888
888    888                      888 888               888
8888888888  8888b.  888d888 .d88888 88888b.   8888b.  888888
888    888     "88b 888P"  d88" 888 888 "88b     "88b 888
888    888 .d888888 888    888  888 888  888 .d888888 888
888    888 888  888 888    Y88b 888 888  888 888  888 Y88b.
888    888 "Y888888 888     "Y88888 888  888 "Y888888  "Y888

👷 Welcome to Hardhat v3.1.0 👷

? Which version of Hardhat would you like to use? …
❯ Hardhat 3 Beta (recommended for new projects)
  Hardhat 2 (older version)
新项目推荐选择Hardhat 3 ,接下会询问选择项目路径和项目类型:
? Where would you like to initialize the project?

Please provide either a relative or an absolute path: › .

What type of project would you like to initialize?
· node-test-runner-viem
我们使用当前路径 . 和 node-test-runner-viem , 在安装完依赖后,项目工程目录如下:
├── contracts/          # 智能合约目录
│   └── Counter.sol
│   └── Counter.t.sol  # Solidity 测试
├── test/              # 测试文件(.ts)
│   └── Counter.ts
├── ignition/modules/   # 部署模块(Hardhat Ignition)
│   └── Counter.ts.     # 描述你想部署哪些合约及初始化等
└── hardhat.config.ts   # 配置文件
编写合约
合约开发推荐使用 Cursor 编辑器或Google Antigravity + Solidity 插件。
默认在 contracts 目录下会包含一个示例 Counter.sol:
// SPDX-License-Identifier: UNLICENSED
pragma solidity ^0.8.28;

contract Counter {
  uint public x;

  event Increment(uint by);

  function inc() public {
    x++;
    emit Increment(1);
  }

  function incBy(uint by) public {
    require(by > 0, "incBy: increment should be positive");
    x += by;
    emit Increment(by);
  }
}
使用 OpenZeppelin 等第三方库
在编写合约时,基于优质开源的第三方库可以提高效率和安全性。例如开发一个 Token,可以用 npm 安装 OpenZeppelin 库:
npm install @openzeppelin/contracts然后在合约中 import 相应的库文件:
pragma solidity ^0.8.0;

import "@openzeppelin/contracts/token/ERC20/ERC20.sol";

contract Token is ERC20 {
    constructor(uint256 initialSupply) ERC20("Token Name", "Token Symbol") {
        _mint(msg.sender, initialSupply);
    }
}
编译合约
hardhat.config.t's 有默认的 Solidity 编译器配置:
require("@nomicfoundation/hardhat-toolbox");

/** @type import('hardhat/config').HardhatUserConfig */
module.exports = {
  solidity: "0.8.28",
};
在终端中运行编译命令:
npx hardhat compileCompiling 1 file with 0.8.28
Compilation finished successfully成功编译后,会在 artifacts/contracts/ 目录下生成包含 ABI 和字节码的 JSON 文件。
说明:
- ABI (Application Binary Interface):包含合约的函数、事件等接口信息
- Bytecode:部署合约所需的字节码
编写测试用例
为智能合约编写自动化测试至关重要。Hardhat 3 开始支持两种测试方式:1. 使用Solidity 测试 ,2. 使用 typescript 编写测试。
我们这里使用 Solidity 编写测试,类似 Foundry 的体验(Hardhat 3 新特性),非常适合熟悉 Solidity 的开发者。
在 test 目录下创建 Counter.t.sol:
// SPDX-License-Identifier: MIT
pragma solidity ^0.8.0;

import {Test} from "forge-std/Test.sol";
import {Counter} from "../contracts/Counter.sol";

contract CounterTest is Test {
    Counter public counter;

    function setUp() public {
        counter = new Counter();
    }

    function test_InitialValue() public view {
      require(counter.x() == 0, "Initial value should be 0");
    }

    function testFuzz_Inc(uint8 x) public {
      for (uint8 i = 0; i < x; i++) {
        counter.inc();
      }
      require(counter.x() == x, "Value after calling inc x times should be x");
    }

    function test_IncByZero() public {
      vm.expectRevert();
      counter.incBy(0);
    }

}代码说明:
- 继承 Test:从
forge-std/Test.sol继承测试基类 - setUp():每个测试前执行的初始化函数
- test_ 前缀:测试函数必须以
test_开头 - 断言:使用
assertEq、assertTrue等断言函数 - 模糊测试:
testFuzz_前缀的函数支持模糊测试
运行 Solidity 测试:
npx hardhat test输出:
  contracts/Counter.t.sol:CounterTest
    ✔ test_InitialValue()
    ✔ test_IncByZero()
    ✔ testFuzz_Inc(uint8) (runs: 256)
使用 console.log 调试合约
在 Hardhat Network 上运行合约时,可以在 Solidity 代码中使用 console.log() 打印日志:
pragma solidity ^0.8.0;

import "hardhat/console.sol";

contract Counter {
  uint256 public count;

  function inc() public {
    x++;

    console.log("x is now:", x);
    emit Increment(1);
  }
}
运行测试时会输出日志:
npx hardhat test
Running node:test tests

x is now: 1
更多 console.log 用法参考文档。
部署合约
Hardhat 3 推荐使用 Hardhat Ignition 进行部署,它是一个声明式的部署系统。
编写部署模块
在 ignition/modules 目录有一个默认的部署脚本 Counter.ts:
import { buildModule } from "@nomicfoundation/hardhat-ignition/modules";

export default buildModule("CounterModule", (m) => {
  const counter = m.contract("Counter");

  m.call(counter, "incBy", [5n]);

  return { counter };
});
稍微解释一下这个脚本:
buildModule 函数是创建部署模块的核心工具。
export default buildModule("CounterModule", (m) => { ... });导出一个名为 "CounterModule" 的模块。m 是一个构建器对象(Module Builder),用它来定义所有的部署操作。Ignition 会记录这些操作并在执行时按照确定的顺序运行。
const counter = m.contract("Counter");告诉 Ignition 部署名为 "Counter" 的合约, 它会在 contracts/ 目录下寻找 Counter.sol 对应的编译产物。counter 是一个代表该合约实例的“未来对象”(Future),你可以把它传给后续的操作使用。
m.call(counter, "incBy", [5n]);在 counter 合约部署完成后,调用它的 incBy 函数。Ignition 会自动发一笔交易去执行 incBy(5)
return { counter };返回在这个模块中部署的合约实例。这让其他模块可以通过 m.useModule(...) 来引用并依赖这个合约。
部署到本地网络
Hardhat 自带一个本地模拟网络: Hardhat Network ,启动 Hardhat Network:
npx hardhat node在另一个终端部署:
npx hardhat ignition deploy ignition/modules/Counter.ts --network localhost输出:
Hardhat Ignition 🚀

Deploying [ CounterModule ]

Batch #1
  Executed CounterModule#Counter

Batch #2
  Executed CounterModule#Counter.incBy

[ CounterModule ] successfully deployed 🚀

Deployed Addresses

CounterModule#Counter - 0x5FbDB2315678afecb367f032d93F642f64180aa3
部署到真实网络
真实网络可以是测试网,也可以主网,需要先准备能支付费用的账号及区块链节点的 RPC URL。
部署账号领水 如果是测试网,我们可以在水龙头获取测试币,这些是当前 Sepolia 网络可用的水龙头:
在水龙头网站粘贴你的钱包地址,领取免费测试币,通常每次可以获得 0.5-1 ETH 的测试币,足够进行多次部署。
获取 RPC URL
在 Chainlist.org 可以找到很多免费的 RPC 节点。这些节点服务商: Alchemy、 Infura、 QuickNode 也有很多的免费访问额度。
配置环境变量
使用 .env 来配置敏感信息, 确保 .env 不会提交到 github 中
SEPOLIA_RPC_URL="..."
SEPOLIA_PRIVATE_KEY="..."
配置 hardhat.config.ts
在 hardhat.config.ts 中添加测试网配置:
import hardhatToolboxViemPlugin from "@nomicfoundation/hardhat-toolbox-viem";
import { defineConfig } from "hardhat/config";
import * as dotenv from "dotenv";
dotenv.config();

export default defineConfig({
  plugins: [hardhatToolboxViemPlugin],
  solidity: "0.8.28",
  networks: {
    sepolia: {
      type: "http",
      chainType: "l1",
      url: process.env.SEPOLIA_RPC_URL,
      accounts: [process.env.SEPOLIA_PRIVATE_KEY],
    },
  },
});配置说明:
type: "http":使用 HTTP 协议连接chainType: "l1":标识这是以太坊 L1 网络url:从配置变量读取 RPC URLaccounts:从配置变量读取私钥
执行部署
确保合约已成功编译,然后执行如下命令部署到 Sepolia 测试网:
npx hardhat ignition deploy ignition/modules/Counter.ts --network sepolia
? Confirm deploy to network sepolia (11155111)? › (y/N)部署过程示例:
Hardhat Ignition 🚀

Deploying [ CounterModule ]

Batch #1
  Executed CounterModule#Counter

Batch #2
  Executed CounterModule#Counter.incBy

[ CounterModule ] successfully deployed 🚀

Deployed Addresses

CounterModule#Counter - 0x04E5913F688563F30304FeFC1484ff71a54E27eA
验证部署结果
部署成功后,你可以:
-
在区块浏览器查看:
- 访问 Sepolia Etherscan
- 搜索合约地址(如上面的
0x04E5913F688563F30304FeFC1484ff71a54E27eA) - 查看合约交易记录
-
查看部署记录: Hardhat Ignition 会在
ignition/deployments目录保存部署记录,包含合约地址和部署参数。
部署过程常见问题
问题 1:insufficient funds for gas
Error: insufficient funds for gas * price + value解决方案:账户余额不足,需要从水龙头获取更多测试币。
问题 2:nonce too low
Error: nonce too low解决方案:删除 ignition/deployments 目录下的部署记录,或使用 --reset 参数重新部署:
npx hardhat ignition deploy ignition/modules/Counter.ts --network sepolia --reset问题 3:无法连接到 RPC
Error: could not detect network解决方案:
- 检查 RPC URL 是否正确
- 检查网络连接是否正常
- 尝试使用其他 RPC 提供商
代码开源验证
代码开源可以增加合约的透明度,是建立信任的重要步骤。
配置
Hardhat 使用 hardhat-verify 插件(hardhat-toolbox 已包含):
module.exports = {
  solidity: ...
  networks: {
    sepolia: {
      url: "https://rpc.sepolia.org",
      accounts: [process.env.PRIVATE_KEY],
    },
  },
  verify: {
    etherscan: {
      apiKey: process.env.ETHERSCAN_API_KEY,
    },
  },
};
如果是将代码开源到 Blockscout 和 Sourcify ,不需要进行任何配置,但开源到 Etherscan 需要 Etherscan API 密钥, 在 https://etherscan.io 的「我的账户」页面,可以创建一个 API KEY。
https://hardhat.org/docs/guides/smart-contract-verification
执行验证
部署后验证合约:
npx hardhat verify --network sepolia 0x合约地址如果合约构造函数有参数:
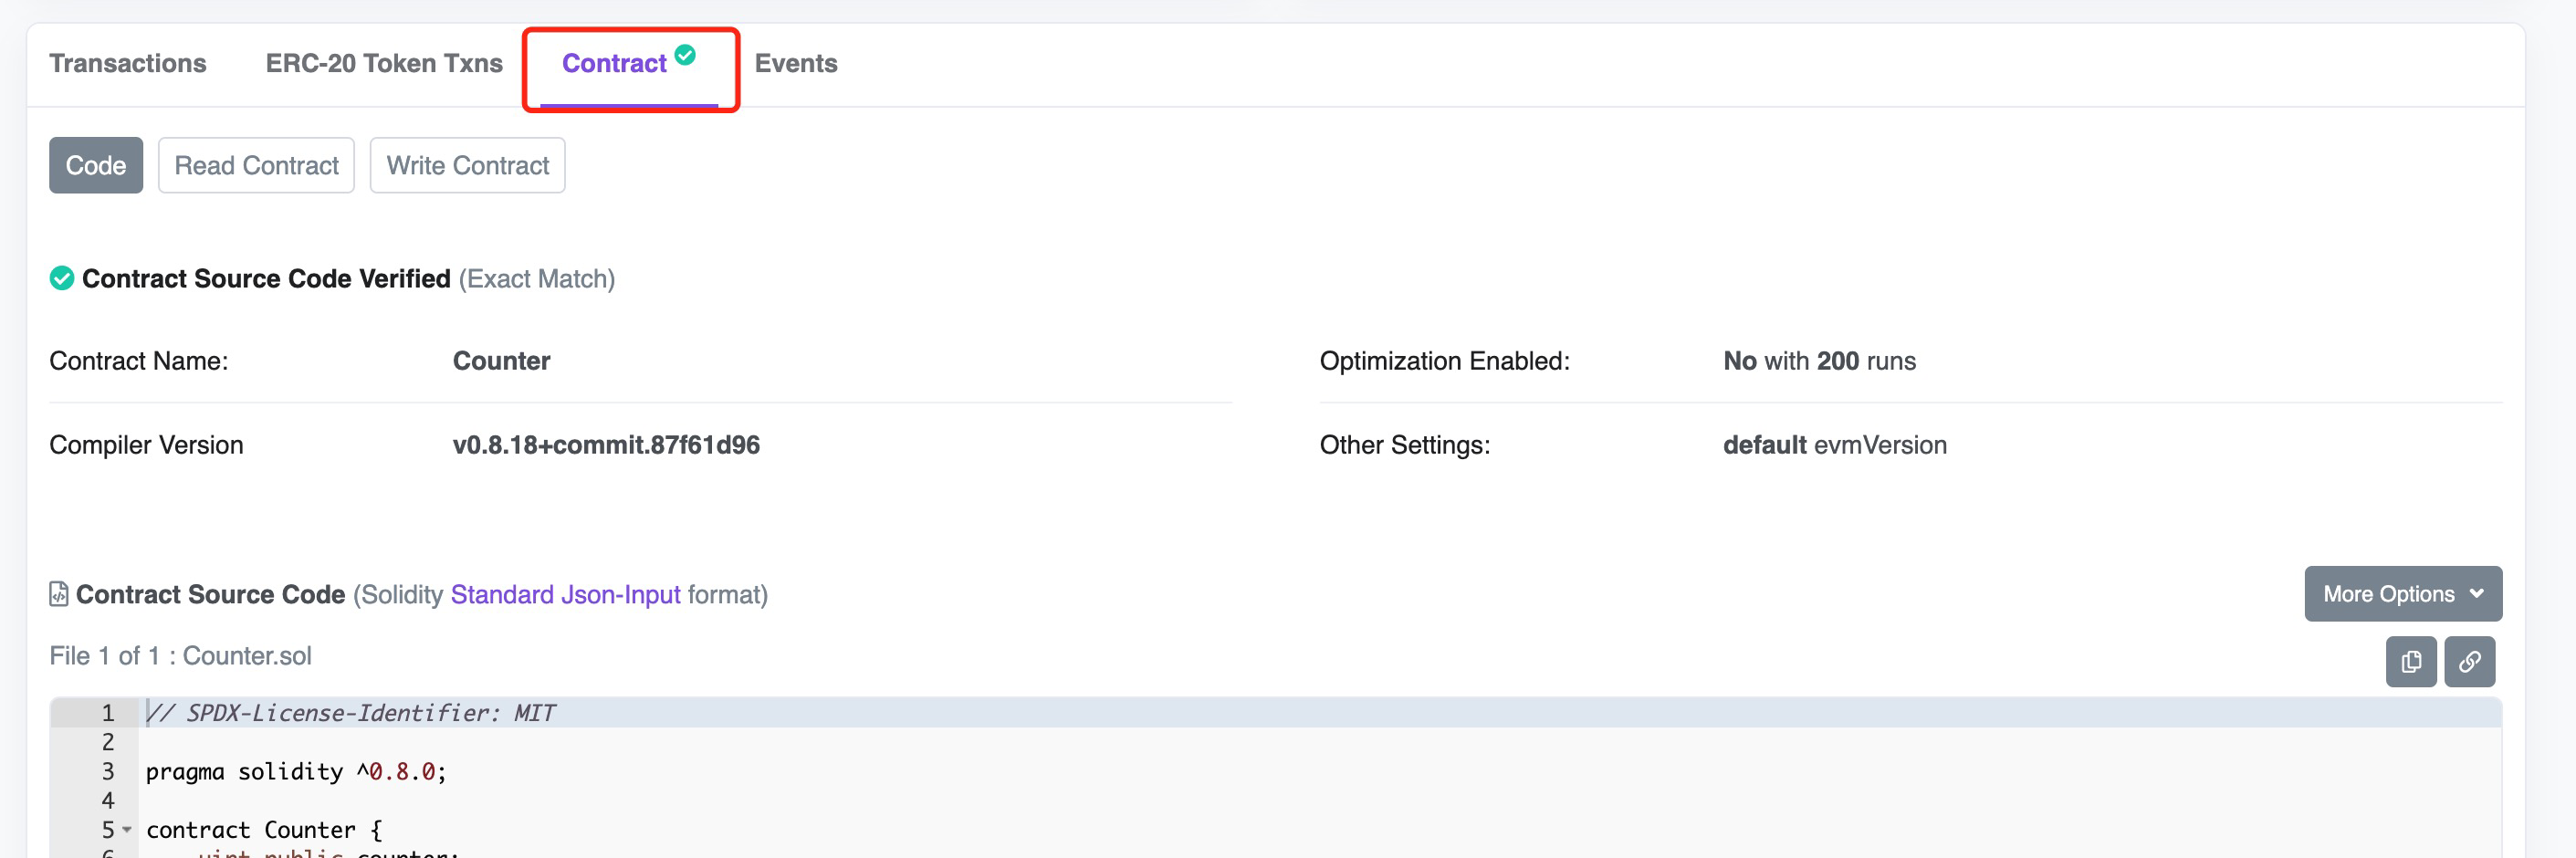
npx hardhat verify --network sepolia 0x合约地址 "参数1" "参数2"验证成功后,在 Etherscan 上可以看到合约源代码:
小结
Hardhat 也是一个强大的以太坊开发框架,在 Hardhat 3 后可以同时支持 Solidity 和 JavaScript 两种测试方式,缩小了与 Foundry 的差距,给开发者提供了更灵活的选择!
如果你是一名 JavaScript/TypeScript 开发者,可以尝试试试使用 Hardhat,如果想纯 Solidity 开发,Foundry 则是更好的选择。


