编写零知识 dApp
- 翻译小组
- 发布于 2023-11-08 17:29
- 阅读 5419
编写零知识 dApp,这篇文章将介绍如何将零知识电路集成到智能合约中,然后再集成到 dApp 中。
这篇文章将介绍如何将零知识电路集成到智能合约中,然后再集成到 dApp 中。
 欢迎来到零知识的世界
介绍
零知识(ZK)密码学世界在过去几个月里一直备受关注。随着新的 zkRollups 和 zkEVM 的宣布,加密世界已经将注意力转向零知识证明的能力,以提供解决隐私和可扩展性问题的优雅解决方案(有关详情,请参阅我之前的文章)。
这文章假设你已经了解 Solidity 和 Typescript(react/next.js),旨在帮助填补如何编写 ZK 电路(在 Circom 中)以及如何将其集成到 next.js 应用程序部分。基本有限域知识也是有用的。
本文的主要目标不是解释如何在 Circom 中编写电路,而是概述从在 Circom 中编写代码到某人可以在其 dApp 中使用的一系列步骤。
我们将构建什么
我们将构建一个简单的 dApp,用于检查你提交的两个数字是否介于 0 和 5 之间,并且它们不相等。你将在浏览器中生成一个 ZK 证明,并仅提交证明以进行交易,因此互联网上甚至合约本身都不会知道提交的两个数字,只知道它们符合上述约束。
在我们开始构建之前,让我们回顾一些内容,以便我们站在坚实的基础上…
什么是 ZK 电路?
ZK 电路是一个程序,给定一些输入,输出一个证明,可以轻松验证电路内运行的每一步计算都是正确的。
如何编写 ZK 电路?
有许多种方法可以创建 ZK 电路,其中一些是高级领域特定语言,例如 Noir 和 Circom,它们允许你编写一个将编译为电路的程序。或者,还有一些底层包,比如 Halo2,你将在其中指定表中的值将落在哪里,该表代表你的电路。
今天,我们将使用 Circom 和 SnarkJS,因为它们都是相对广泛使用的,目前可以在浏览器中生成证明。
需要知道的知识
在 Circom 和大多数其他领域特定语言中编写代码意味着你需要熟悉处理域元素和编写约束。
域元素(Field elements)
在 Circom 中,只有一种数据类型,即域元素。对于本教程的目的,你可以将域元素视为基本上是模大素数的任何数字,该素数基于所使用的椭圆曲线。Circom 中的默认曲线是 BN128。
约束
电路可以接受来自生成证明实体的任意输入,因此这些输入必须在电路内受到约束,以便输入、输出和中间值落在一些可接受的值集内或与另一个变量保持某种关系。约束的两个示例可能是确保一个输入是另一个输入的平方,或者输入不等于输出。我们将讨论如何在代码示例中编写这些内容。
一般流程
我们将要涵盖的过程的一般流程,在这个图中可视化了:
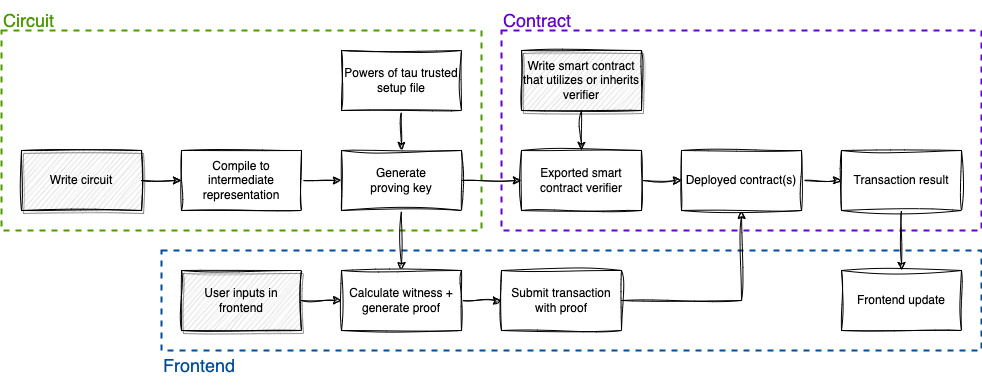
创建零知识 dApp 的整体流程。突出显示的框是开发者或用户输入。
让我们开始吧
我相信你已经厌倦了介绍和背景知识,所以让我们直接开始。我将根据上面的一般流程图将其分解为三个部分,以便更容易跟踪。电路部分讨论了在 Circom 中编写 ZK 电路的所有内容,然后我们将其导出到合约部分,该部分与前端部分进行交互。
我们将使用的证明系统是 Plonk,它允许我们拥有一个通用的可信设置,而不必为每个电路生成额外的随机性。它比 Groth16 证明系统慢,但对我们现在想要的东西已经足够了。
这是本文代码库的链接:https://github.com/ytham/zk_example_dapp
设置
在继续之前,我们需要安装以下软件包:
让我们首先创建项目文件夹。我们将使用以下设置使用命令创建一个 next.js 应用程序:
yarn create next-app

我们新的 next.js 存储库的设置
完成后,cd 进入文件夹,然后运行以下命令以添加以下软件包:
yarn add circomlib snarkjs wagmi ethers@^5 axios @mantine/core @mantine/hooks @mantine/notifications @emotion/react
电路
电路部分突出显示
设置
确保你在项目文件夹中,并创建一个名为 circuits 的文件夹,然后在 circuits 文件夹内创建一个名为 build 的文件夹。我们将在本节中使用 circuits 文件夹。
编写电路
如上所述,我们将编写一个电路,该电路接受两个输入,确保它们都介于 0 和 5 之间,并确保它们彼此不相等。然后它将相乘并输出这两个值。我在下面的 circom 文件中添加了内部注释:
注意: 顶部写着 // file: <filename>的行实际上不是文件的一部分,它只是告诉你文件相对于项目根目录的位置。
// file: /circuits/simple_multiplier.circom

pragma circom 2.1.3;

include "../node_modules/circomlib/circuits/comparators.circom";

template SimpleMultiplier() {
    // Private input signals
    signal input in[2];

    // Output signal (public)
    signal output out;

    // Create a constraint here saying that our two input signals cannot
    // equal each other.
    component isz = IsZero();
    isz.in <== in[0] - in[1];

    // The IsZero component returns 1 if the input is 0, or 0 otherwise.
    isz.out === 0;

    // Define the greater than and less than components that we'll define
    // inside the for loop below.
    component gte[2];
    component lte[2];

    // We loop through the two signals to compare them.
    for (var i = 0; i < 2; i++) {
        // Both the LessEqThan and GreaterEqThan components take number of
        // bits as an input. In this case, we want to ensure our inputs are
        // [0,5], which requires 3 bits (101).
        lte[i] = LessEqThan(3);

        // We put our circuit's input signal as the input signal to the
        // LessEqThan component and compare it against 5.
        lte[i].in[0] <== in[i];
        lte[i].in[1] <== 5;

        // The LessEqThan component outputs a 1 if the evaluation is true,
        // 0 otherwise, so we create this equality constraint.
        lte[i].out === 1;

        // We do the same with GreaterEqThan, and also require 3 bits since
        // the range of inputs is still [0,5].
        gte[i] = GreaterEqThan(3);

        // Compare our input with 0
        gte[i].in[0] <== in[i];
        gte[i].in[1] <== 0;

        // The GreaterEqThan component outputs a 1 if the evaluation is true,
        // 0 otherwise, so we create this equality constraint.
        gte[i].out === 1;
    }

    // Write a * b into c and then constrain c to be equal to a * b.
    out <== in[0] * in[1];
}

component main = SimpleMultiplier();
编译为中间表示
完成电路后,我们将将其编译为称为 R1CS(Rank-1 Constraint System)的中间表示。有关 R1CS 的其他信息可以在先前的文章中找到。在 circuits 文件夹中运行以下命令:
circom simple_multiplier.circom --r1cs --wasm --sym -o build
这将在 circuits/build 文件夹中输出 R1CS、WASM 和符号,并显示电路数据,包括约束数量。
Powers of Tau 可信设置文件
已生成了许多 Powers of Tau 可信设置,我们可以根据我们的电路大小(约束数量)使用。为了减少证明时间,你将希望使用最接近你电路大小的 Powers of Tau。你可以在此存储库中找到可信设置文件:
让我们继续使用最小的一个(powersOfTau28_hez_final_08.ptau),它支持最多 256 个约束,因为我们的电路有约 14 个约束。
生成证明密钥(proving key)
现在,从 circuits 目录,运行以下命令来生成我们将使用来生成证明的证明密钥,该证明密钥使用了 R1CS 和 ptau 文件:
snarkjs plonk setup build/simple_multiplier.r1cs ptau/powersOfTau28_hez_final_08.ptau build/proving_key.zkey
合约
合约部分突出显示
设置
在项目根目录中创建一个名为 contracts 的新目录。cd contracts 然后使用以下 Foundry 命令在 contracts 文件夹内创建一个新项目:
forge init --no-commit
删除 script、src 和 test 文件夹中生成的起始文件。
在 contracts 文件夹中也添加一个 .env 文件,其中你将添加要从中部署的钱包的私钥(确保此钱包中有一些 GoerliETH,你可以从Goerli PoW faucet获取)。你还需要具有 Alchemy 的帐户(或其他选择的 RPC 提供者),并从 Alchemy 仪表板输入你的 RPC url:
// file: /contracts/.env

GOERLI_RPC_URL=https://eth-goerli.g.alchemy.com/v2/<YOUR_GOERLI_API_KEY>
PRIVATE_KEY=<YOUR_PRIVATE_KEY>
还将以下内容添加到 foundry.toml 文件中:
// file: /contracts/foundry.toml

[profile.default]
src = 'src'
out = 'out'
libs = ['lib']

# Add this
[rpc_endpoints]
goerli = "${GOERLI_RPC_URL}"
导出智能合约验证者
我们可以使用以下 SnarkJS 命令从项目根目录生成验证者智能合约:
snarkjs zkey export solidityverifier circuits/build/proving_key.zkey contracts/src/PlonkVerifier.sol
编写智能合约
编写以下合约,该合约利用我们上面导出的 PlonkVerifier.sol 文件。合约仅基于 PlonkVerifier 的结果输出一个布尔值 true 或 false,但你可以想象编写一些铸造 NFT、转移代币、部署另一个合约或任何你能想到的其他内容。为简洁起见,我省略了测试。
// file: /contracts/src/SimpleMultiplier.sol

// SPDX-License-Identifier: UNLICENSED
pragma solidity ^0.8.13;

// Interface to PlonkVerifier.sol
interface IPlonkVerifier {
    function verifyProof(bytes memory proof, uint[] memory pubSignals) external view returns (bool);
}

contract SimpleMultiplier {
    address public s_plonkVerifierAddress;

    event ProofResult(bool result);

    constructor(address plonkVerifierAddress) {
        s_plonkVerifierAddress = plonkVerifierAddress;
    }

    // ZK proof is generated in the browser and submitted as a transaction w/ the proof as bytes.
    function submitProof(bytes memory proof, uint256[] memory pubSignals) public returns (bool) {
        bool result = IPlonkVerifier(s_plonkVerifierAddress).verifyProof(proof, pubSignals);
        emit ProofResult(result);
        return result;
    }
}
在 contracts 文件夹中运行以下命令构建合约:
forge build
然后,返回到项目根目录,然后在 src/lib 文件夹中创建一个名为 abi 的文件夹,并将 json 输出复制到该文件夹中:
mkdir -p src/lib/abi
cp contracts/out/SimpleMultiplier.sol/SimpleMultiplier.json src/lib/abi/.
部署合约
然后,使用部署脚本部署合约:
// file: /contracts/scripts/SimpleMultiplier.s.sol

// SPDX-License-Identifier: UNLICENSED
pragma solidity ^0.8.13;

import "forge-std/Script.sol";
import "../src/PlonkVerifier.sol";
import "../src/SimpleMultiplier.sol";

contract SimpleMultiplierScript is Script {
    function setUp() public {}

    function run() public {
        uint256 deployerPrivateKey = vm.envUint("PRIVATE_KEY");
        vm.startBroadcast(deployerPrivateKey);

        PlonkVerifier pv = new PlonkVerifier();
        SimpleMultiplier sm = new SimpleMultiplier(address(pv));

        vm.stopBroadcast();
    }
}
并使用以下命令运行部署脚本:
forge script script/SimpleMultiplier.s.sol SimpleMultiplierScript --broadcast --verify --rpc-url goerli
你将看到两个合约已部署。第一个是 PlonkVerifier 合约,第二个是 SimpleMultiplier 合约。我们只需要 SimpleMultiplier 合约的地址。让我们保存这个地址以便稍后在前端中使用:
// file: /src/shared/addresses.ts

export const Addresses = {
  SIMPLE_MULTIPLIER_ADDR: "<YOUR_DEPLOYED_CONTRACT_ADDR>" as `0x${string}`,
}
太棒了!现在我们已经部署了我们的验证者和合约,并准备好继续在浏览器中构建用户界面!
前端
前端部分突出显示
设置
我们将通过 Github 部署我们的 dApp 到 Vercel,因此请确保在继续之前你在这两个地方都有帐户。
创建前端
我们将通过创建或修改以下文件来构建前端界面。为简洁起见,我在各个页面中使用了许多项,而不是为它们创建单独的组件。我也没有处理各种每种错误情况。这不是一个 next.js/react 教程,因此我假设读者已经有了基本的了解。
我们使用 Wagmi 包连接到区块链,并将整个应用程序包装在 WagmiConfig 中:
// file: /src/pages/_app.tsx

import '@/styles/globals.css'
import { WagmiConfig, createClient, configureChains, goerli } from 'wagmi'
import { publicProvider } from 'wagmi/providers/public'
import type { AppProps } from 'next/app'
import { MantineProvider } from '@mantine/core'
import { Notifications } from '@mantine/notifications';

// We'll just be using Goerli testnet for now
const { chains, provider, webSocketProvider } = configureChains(
  [goerli],
  [publicProvider()],
)

const client = createClient({
  autoConnect: true,
  provider,
  webSocketProvider,
})

export default function App({ Component, pageProps }: AppProps) {
  // We'll be using Wagmi sending our transaction and Mantine for CSS
  // and notifications
  return (
    <WagmiConfig client={client}>
      <MantineProvider withNormalizeCSS>
        <Notifications />
        <Component {...pageProps} />
      </MantineProvider>
    </WagmiConfig>
  )
}
我们的 index.tsx 文件包含一个 ConnectWalletButton 和两个输入字段,用户可以在其中输入他们的数字 [0,5]。当用户按下两个输入字段的提交按钮时,它会将一个 POST 请求发送到后端,其中包含输入以生成证明。生成证明后,它将该证明数据作为交易提交到区块链。
理想情况下,我们希望将其分成许多不同的组件文件,但为简单起见,它都在一个文件中:
// file: /src/pages/index.tsx

import Head from 'next/head'
import Link from 'next/link';
import { useState } from 'react';
import { Stack, Text, Title, Grid, Input, Button, Group, Space } from '@mantine/core'
import axios, { AxiosRequestConfig } from 'axios';
import { useAccount } from 'wagmi';
import { notifications } from "@mantine/notifications";
import { ConnectWalletButton } from '@/components/ConnectWalletButton';
import { executeTransaction } from '@/lib/executeTransaction';

export default function Home() {
  const [input0, setInput0] = useState("");
  const [input1, setInput1] = useState("");
  const { isConnected } = useAccount();

  const handleGenerateProofSendTransaction = async (e: any) => {
    e.preventDefault();

    // We will send an HTTP request with our inputs to our next.js backend to
    // request a proof to be generated.
    const data = {
      input0,
      input1,
    }
    const config: AxiosRequestConfig = {
      headers: {
        "Content-Type": "application/json",
      }
    }

    // Send the HTTP request
    try {
      const res = await axios.post("/api/generate_proof", data, config);
      notifications.show({
        message: "Proof generated successfully! Submitting transaction...",
        color: "green",
      });

      // Split out the proof and public signals from the response data
      const { proof, publicSignals } = res.data;

      // Write the transaction
      const txResult = await executeTransaction(proof, publicSignals);
      const txHash = txResult.transactionHash;

      notifications.show({
        message: `Transaction succeeded! Tx Hash: ${txHash}`,
        color: "green",
        autoClose: false,
      });
    } catch (err: any) {
      const statusCode = err?.response?.status;
      const errorMsg = err?.response?.data?.error;
      notifications.show({
        message: `Error ${statusCode}: ${errorMsg}`,
        color: "red",
      });
    }
  }

  // Only allow submit if the user first connects their wallet
  const renderSubmitButton = () => {
    if (!isConnected) {
      return <ConnectWalletButton />
    }
    return (
      <Button type="submit">Generate Proof & Send Transaction</Button>
    )
  }

  return (
    <>
      <Head>
        <title>ZK Simple Multiplier</title>
        <link rel="icon" href="/favicon.ico" />
      </Head>
      <Stack justify="center" align="center" w="100vw" h="100vh" spacing={0}>
        <Stack align="center" spacing={0}>
          <Group w="96vw" h="10vh" position="apart" align="center">
            <Title order={3}>
              ZK Simple Multiplier
            </Title>
            <ConnectWalletButton />
          </Group>
          <Grid align="center" justify="center" mih="80vh">
            <Grid.Col sm={8} md={6} lg={4}>
              <Text>
                {"Input two numbers between 0 and 5, inclusive. The two numbers must \
                not be equal. We'll generate a ZK proof locally in the browser, and \
                only the proof will be sent to the blockchain so that no one \
                watching the blockchain will know the two numbers."}
              </Text>
              <Space h={20} />
              <form onSubmit={handleGenerateProofSendTransaction}>
                <Stack spacing="sm">
                  <Input.Wrapper label="Input 0">
                    <Input
                      placeholder="Number between 0 and 5"
                      value={input0}
                      onChange={(e) => setInput0(e.currentTarget.value)}
                    />
                  </Input.Wrapper>
                  <Input.Wrapper label="Input 1">
                  <Input
                      placeholder="Number between 0 and 5"
                      value={input1}
                      onChange={(e) => setInput1(e.currentTarget.value)}
                    />
                  </Input.Wrapper>
                  <Space h={10} />
                  { renderSubmitButton() }
                </Stack>
              </form>
            </Grid.Col>
          </Grid>
          <Group w="96vw" h="10vh" position="center" align="center">
            <Link href="https://medium.com/@yujiangtham/writing-a-zero-knowledge-dapp-fd7f936e2d43">
              <Text>
                Created using this tutorial!
              </Text>
            </Link>
          </Group>
        </Stack>
      </Stack>
    </>
  )
}
对于 ConnectWalletButton,我们使用 Metamask 来连接它,因为它是最受欢迎的,但你也可以使用其他任何你喜欢的钱包,并使用适当的Wagmi 连接器。
// file: /src/components/ConnectWalletButton.tsx

import { Button } from "@mantine/core"
import { disconnect } from "@wagmi/core";
import { useAccount, useConnect, useEnsName } from 'wagmi'
import { InjectedConnector } from 'wagmi/connectors/injected'

export const ConnectWalletButton = () => {
  const { address, isConnected } = useAccount();
  const { data: ensName } = useEnsName({ address });
  const { connect } = useConnect({
    connector: new InjectedConnector(),
  });

  const handleClick = () => {
    if (isConnected) {
      disconnect();
    } else {
      connect();
    }
  }

  const renderConnectText = () => {
    if (isConnected) {
      const start = address?.slice(0,6);
      const end = address?.slice(address.length-4, address.length);
      return `${start}...${end}`;
    } else {
      return "Connect Wallet";
    }
  }

  return (
    <Button onClick={handleClick}>
      { renderConnectText() }
    </Button>
  )
}
一旦我们从后端收到输入,我们解析输入,然后调用我们的 generateProof 库函数(我们将在下一节中实现):
// file: /src/pages/api/generate_proof.ts

import { generateProof } from '@/lib/generateProof';
import type { NextApiRequest, NextApiResponse } from 'next'

export default async function handler(
  req: NextApiRequest,
  res: NextApiResponse,
) {
  const body = req?.body;
  if (body === undefined) {
    return res.status(403).json({error: "Request has no body"});
  }
  console.log(body);

  const input0 = parseInt(body.input0);
  const input1 = parseInt(body.input1);

  if (input0 === undefined || Number.isNaN(input0)
    || input1 === undefined || Number.isNaN(input1)) {
    return res.status(403).json({error: "Invalid inputs"});
  }
  const proof = await generateProof(input0, input1);

  if (proof.proof === "") {
    return res.status(403).json({error: "Proving failed"});
  }

  res.setHeader("Content-Type", "text/json");
  res.status(200).json(proof);
}
计算见证并生成证明
见证计算和证明生成在以下文件中使用 snarkjs.plonk.fullProve 一步完成。然后将数据转换为 Solidity calldata blob,进一步拆分为 proof 和 publicSignals。
// file: /src/lib/generateProof.ts

import path from "path";
// @ts-ignore
import * as snarkjs from 'snarkjs';

export const generateProof = async (input0: number, input1: number): Promise<any> => {
  console.log(`Generating vote proof with inputs: ${input0}, ${input1}`);

  // We need to have the naming scheme and shape of the inputs match the .circom file
  const inputs = {
    in: [input0, input1],
  }

  // Paths to the .wasm file and proving key
  const wasmPath = path.join(process.cwd(), 'circuits/build/simple_multiplier_js/simple_multiplier.wasm');
  const provingKeyPath = path.join(process.cwd(), 'circuits/build/proving_key.zkey')

  try {
    // Generate a proof of the circuit and create a structure for the output signals
    const { proof, publicSignals } = await snarkjs.plonk.fullProve(inputs, wasmPath, provingKeyPath);

    // Convert the data into Solidity calldata that can be sent as a transaction
    const calldataBlob = await snarkjs.plonk.exportSolidityCallData(proof, publicSignals);
    const calldata = calldataBlob.split(',');

    console.log(calldata);

    return {
      proof: calldata[0],
      publicSignals: JSON.parse(calldata[1]),
    }
  } catch (err) {
    console.log(`Error:`, err)
    return {
      proof: "",
      publicSignals: [],
    }
  }
}
提交交易
交易在此文件中提交:
// file: /src/lib/executeTransaction.ts

import { Addresses } from '@/shared/addresses';
import { TransactionReceipt } from '@ethersproject/abstract-provider';
import { prepareWriteContract, writeContract } from '@wagmi/core';

export const executeTransaction = async (proof: any, publicSignals: Array<string>): Promise<TransactionReceipt> => {
  const abiPath = require('./abi/SimpleMultiplier.json');

  // Prepare the transaction data
  const config = await prepareWriteContract({
    address: Addresses.SIMPLE_MULTIPLIER_ADDR,
    abi: abiPath.abi,
    functionName: 'submitProof',
    args: [proof, publicSignals]
  });

  // Execute the transaction
  const writeResult = await writeContract(config);

  // Wait for the transaction block to be mined
  const txResult = await writeResult.wait();
  return txResult;
}
使用结果更新 UI
交易结果在 await txResult.wait() 的输出中给出。在这里,我们只是向用户发送了一个通知,但你可以以最适合你的方式更新 UI 信息。
与你的应用程序交互
你可以通过在项目根目录中运行 yarn dev 来运行本地服务器进行尝试。
此外,你还可以部署到 Vercel,使你的 dApp 可供任何人在网络上使用。首先,创建一个新的 Github 存储库,并提交所有更改并将文件推送到该存储库。转到 Vercel,然后添加一个新项目:
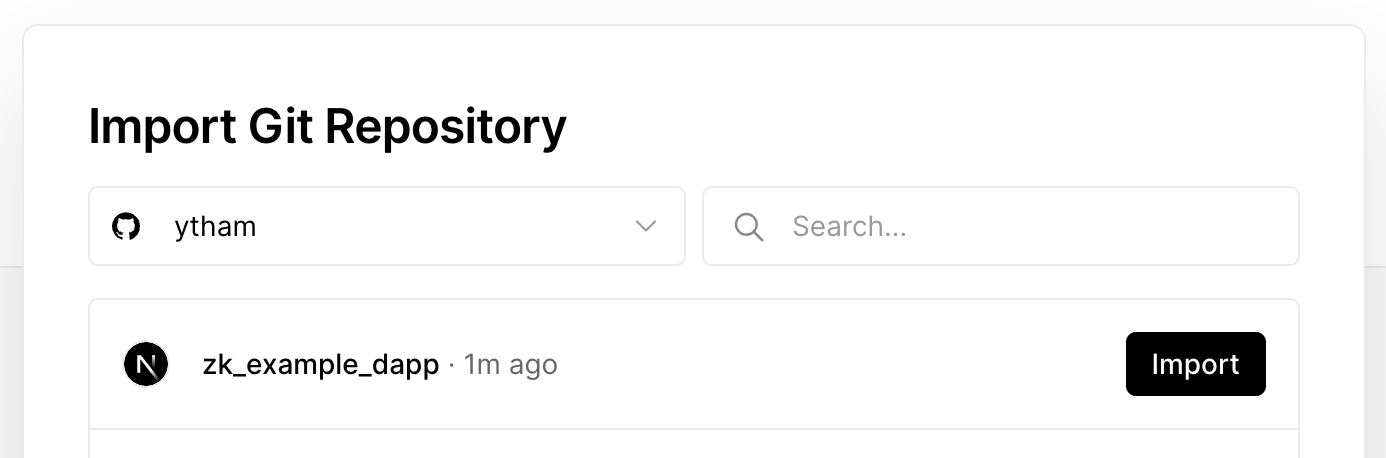
在 Vercel 中添加一个新项目
选择要导入的 git 存储库:
要导入的 git 存储库
确保框架预设为 Next.js,然后点击部署。
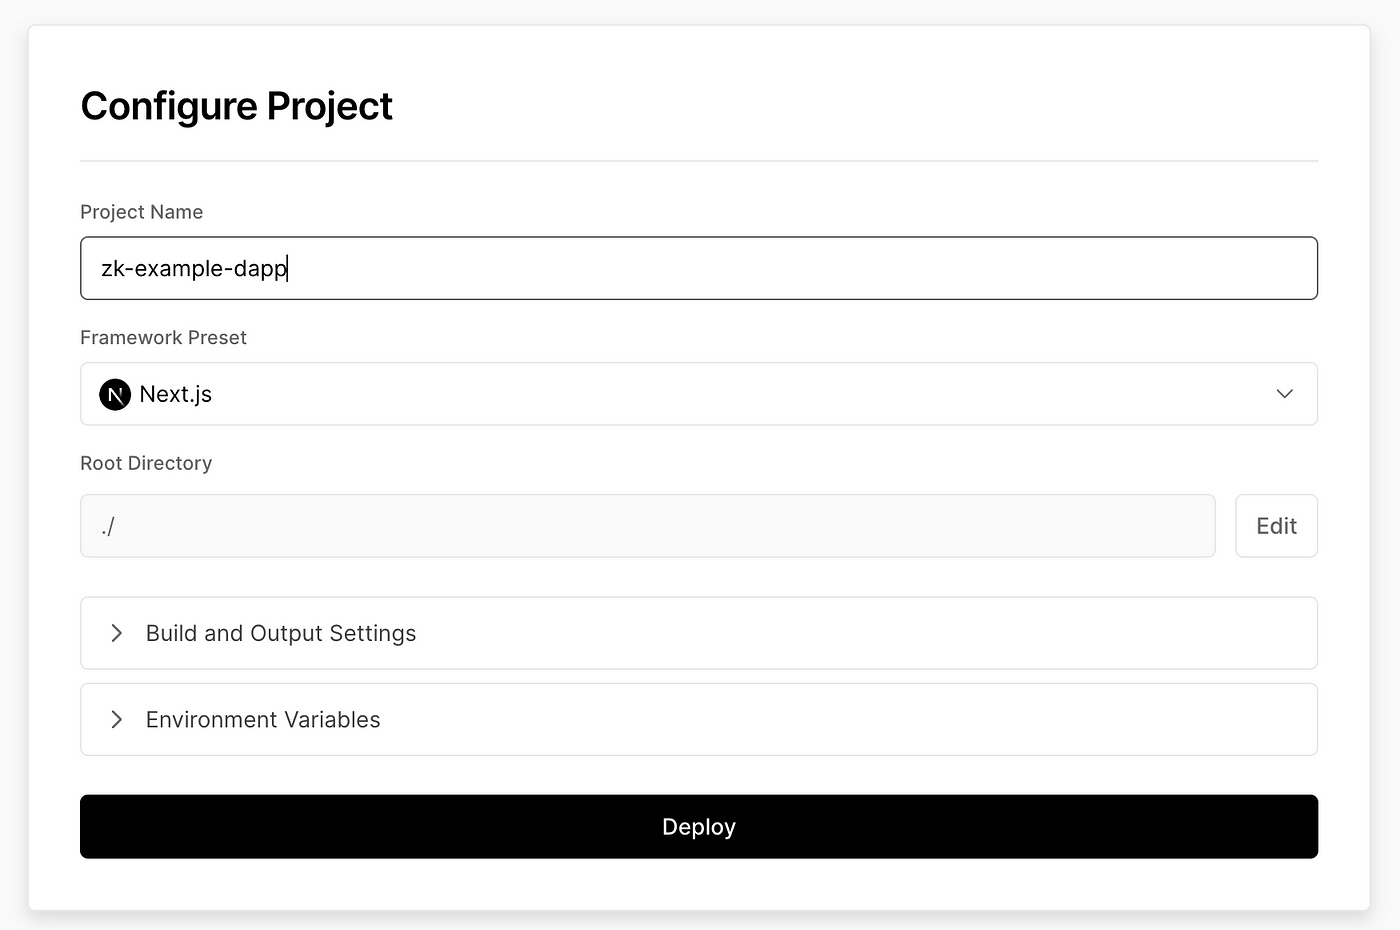
等待几分钟以便项目构建,然后你应该会得到一个链接,你可以使用它或将其发送给你的朋友。我的部署在这里:
来试试吧!转到你在Vercel上部署的页面并试试吧!
总结
电路
- 编写circom电路
- 编译电路:
circom circuit.circom --r1cs --wasm --sym - 下载powers of tau可信设置文件
- 运行Plonk设置以获取验证密钥:
snarkjs plonk setup circuit.r1cs ptau_file.ptau proving_key.zkey
合约
- 导出验证器智能合约
snarkjs zkey export solidityverifier proving_key.zkey verifier.sol - 将验证器集成到你的Solidity项目中
前端
- 获取用户输入
- 在一步中计算见证并生成证明
await snarkjs.plonk.fullProve({ inputs }, wasmPath, provingKeyPath); - 使用证明提交交易给验证器合约
希望本文对你的zk dApp开发之旅有所帮助。欢迎你在Twitter上关注我!干杯!
本翻译由 DeCert.me 协助支持, 在 DeCert 构建可信履历,为自己码一个未来。


