用 Gill 库解锁 Web3:Solana 代币转账实战
- 寻月隐君
- 发布于 2025-05-06 10:03
- 阅读 2439
用Gill库解锁Web3:Solana代币转账实战Web3时代来袭,Solana以其高性能成为区块链开发的明星平台。想快速掌握Web3开发?本文带你用Gill库在Solana测试网上实现SOL代币转账!通过TypeScript和Gill的强大功能,从项目搭建到交
用 Gill 库解锁 Web3:Solana 代币转账实战
Web3 时代来袭,Solana 以其高性能成为区块链开发的明星平台。想快速掌握 Web3 开发?本文带你用 Gill 库在 Solana 测试网上实现 SOL 代币转账!通过 TypeScript 和 Gill 的强大功能,从项目搭建到交易确认,全程代码实战。这篇教程将是你探索 Web3 与 Solana 生态的完美起点,适合开发者与区块链爱好者!
本文是一份 Web3 开发的实战指南,展示如何用 TypeScript 和 Gill 库在 Solana 测试网上完成 SOL 代币转账。教程涵盖项目初始化、依赖安装、交易构建与签名,以及测试网交易确认的完整流程。通过 Gill 库,你将轻松实现 0.001 SOL 转账,并通过 Solana 浏览器验证结果。想深入 Web3 与 Solana?这份教程不容错过!
实操
创建项目并切换到项目目录
mcd solana-raw-tx # mkdir solana-raw-tx && cd solana-raw-tx
/Users/qiaopengjun/Code/Solana/SolanaSandbox/solana-raw-tx
初始化项目
pnpm init 是一个命令,用于在当前目录下初始化一个新的 pnpm 项目。它会创建一个 package.json 文件,这个文件是 Node.js 项目的主要配置文件,用于定义项目的元数据、依赖、脚本等信息。
tsc --init 是一个命令,用于在当前目录下初始化一个 TypeScript 项目,生成一个 tsconfig.json 文件。tsconfig.json 是 TypeScript 的配置文件,用于指定编译选项、文件包含规则和其他 TypeScript 编译行为。
pnpm init
Wrote to /Users/qiaopengjun/Code/Solana/SolanaSandbox/solana-raw-tx/package.json

{
  "name": "solana-raw-tx",
  "version": "1.0.0",
  "description": "",
  "main": "index.js",
  "scripts": {
    "test": "echo \"Error: no test specified\" && exit 1"
  },
  "keywords": [],
  "author": "",
  "license": "ISC",
  "packageManager": "pnpm@10.9.0"
}

tsc --init

Created a new tsconfig.json with:
                                                                                                                     TS
  target: es2016
  module: commonjs
  strict: true
  esModuleInterop: true
  skipLibCheck: true
  forceConsistentCasingInFileNames: true

You can learn more at https://aka.ms/tsconfig
安装相关依赖
pnpm install typescript --save-dev

   ╭──────────────────────────────────────────╮
   │                                          │
   │   Update available! 10.9.0 → 10.10.0.    │
   │   Changelog: https://pnpm.io/v/10.10.0   │
   │     To update, run: pnpm self-update     │
   │                                          │
   ╰──────────────────────────────────────────╯

Packages: +1
+
Progress: resolved 1, reused 1, downloaded 0, added 1, done

devDependencies:
+ typescript 5.8.3

Done in 874ms using pnpm v10.9.0

pnpm self-update
Nothing to stop. No server is running for the store at /Users/qiaopengjun/Library/pnpm/store/v10
The current project has been updated to use pnpm v10.10.0

pnpm add gill
Packages: +45
+++++++++++++++++++++++++++++++++++++++++++++
Progress: resolved 46, reused 8, downloaded 38, added 45, done

dependencies:
+ gill 0.9.0

Done in 2.4s using pnpm v10.10.0
withGill.ts 文件
import {
    getExplorerLink,
    createTransaction,
    createSolanaClient,
    getSignatureFromTransaction,
    signTransactionMessageWithSigners,
    generateKeyPairSigner,
    getTransactionCodec,
    Address,
    createSolanaRpc, createSolanaRpcSubscriptions, devnet
} from "gill";
import { loadKeypairSignerFromFile } from "gill/node";
import {
    getAddMemoInstruction,
    getTokenStandardCodec,
    getTransferSolInstruction,
} from "gill/programs";
// 1. 引入依赖

// 2. 创建 Solana 客户端 Solana 客户端设置
const { rpc, sendAndConfirmTransaction } = createSolanaClient({
    urlOrMoniker:
    "https://devwE1",
});

// const rpc = createSolanaRpc(devnet("https://rp95M"));
// const rpcSubscriptions = createSolanaRpcSubscriptions(
//     devnet("wss://api.devnet.solana.com")
// );

// 3. 获取最新区块哈希
const { value: latestBlockhash } = await rpc.getLatestBlockhash().send();

// 4. 加载签名者和生成随机接收者
const signer = await loadKeypairSignerFromFile();
console.log(`Signer address: ${signer.address}`);

const randomReceiver = await generateKeyPairSigner();

// 5. 构建交易 交易创建
const tx = createTransaction({
    version: "legacy",
    feePayer: signer,
    instructions: [
        getTransferSolInstruction({
            amount: 1_000_000,
            destination: randomReceiver.address,
            source: signer,
        }),
    ],
    latestBlockhash,
    computeUnitLimit: 450,
    computeUnitPrice: 1_000,
});

// 6. 签名交易
const signedTransaction = await signTransactionMessageWithSigners(tx);

const rawTxBytes = getTransactionCodec().encode(signedTransaction);
console.log("Raw transaction bytes:", rawTxBytes);

// 7. 发送并确认交易
try {
    const signedTx = getSignatureFromTransaction(signedTransaction);
    console.log(
        "Explorer link:",
        getExplorerLink({
            cluster: "devnet",
            transaction: signedTx,
        })
    );

    await sendAndConfirmTransaction(signedTransaction);

    console.log("Transaction confirmed!");
} catch (error) {
    console.error("Unable to send and confirm the transaction.");
    console.error("Error:", error);
}
Gill is built on top of the modern javascript libraries for Solana built by Anza and used in (@solana/kit aka "web3.js v2"). By utilizing the same types and functions under the hood, gill is compatible with kit.
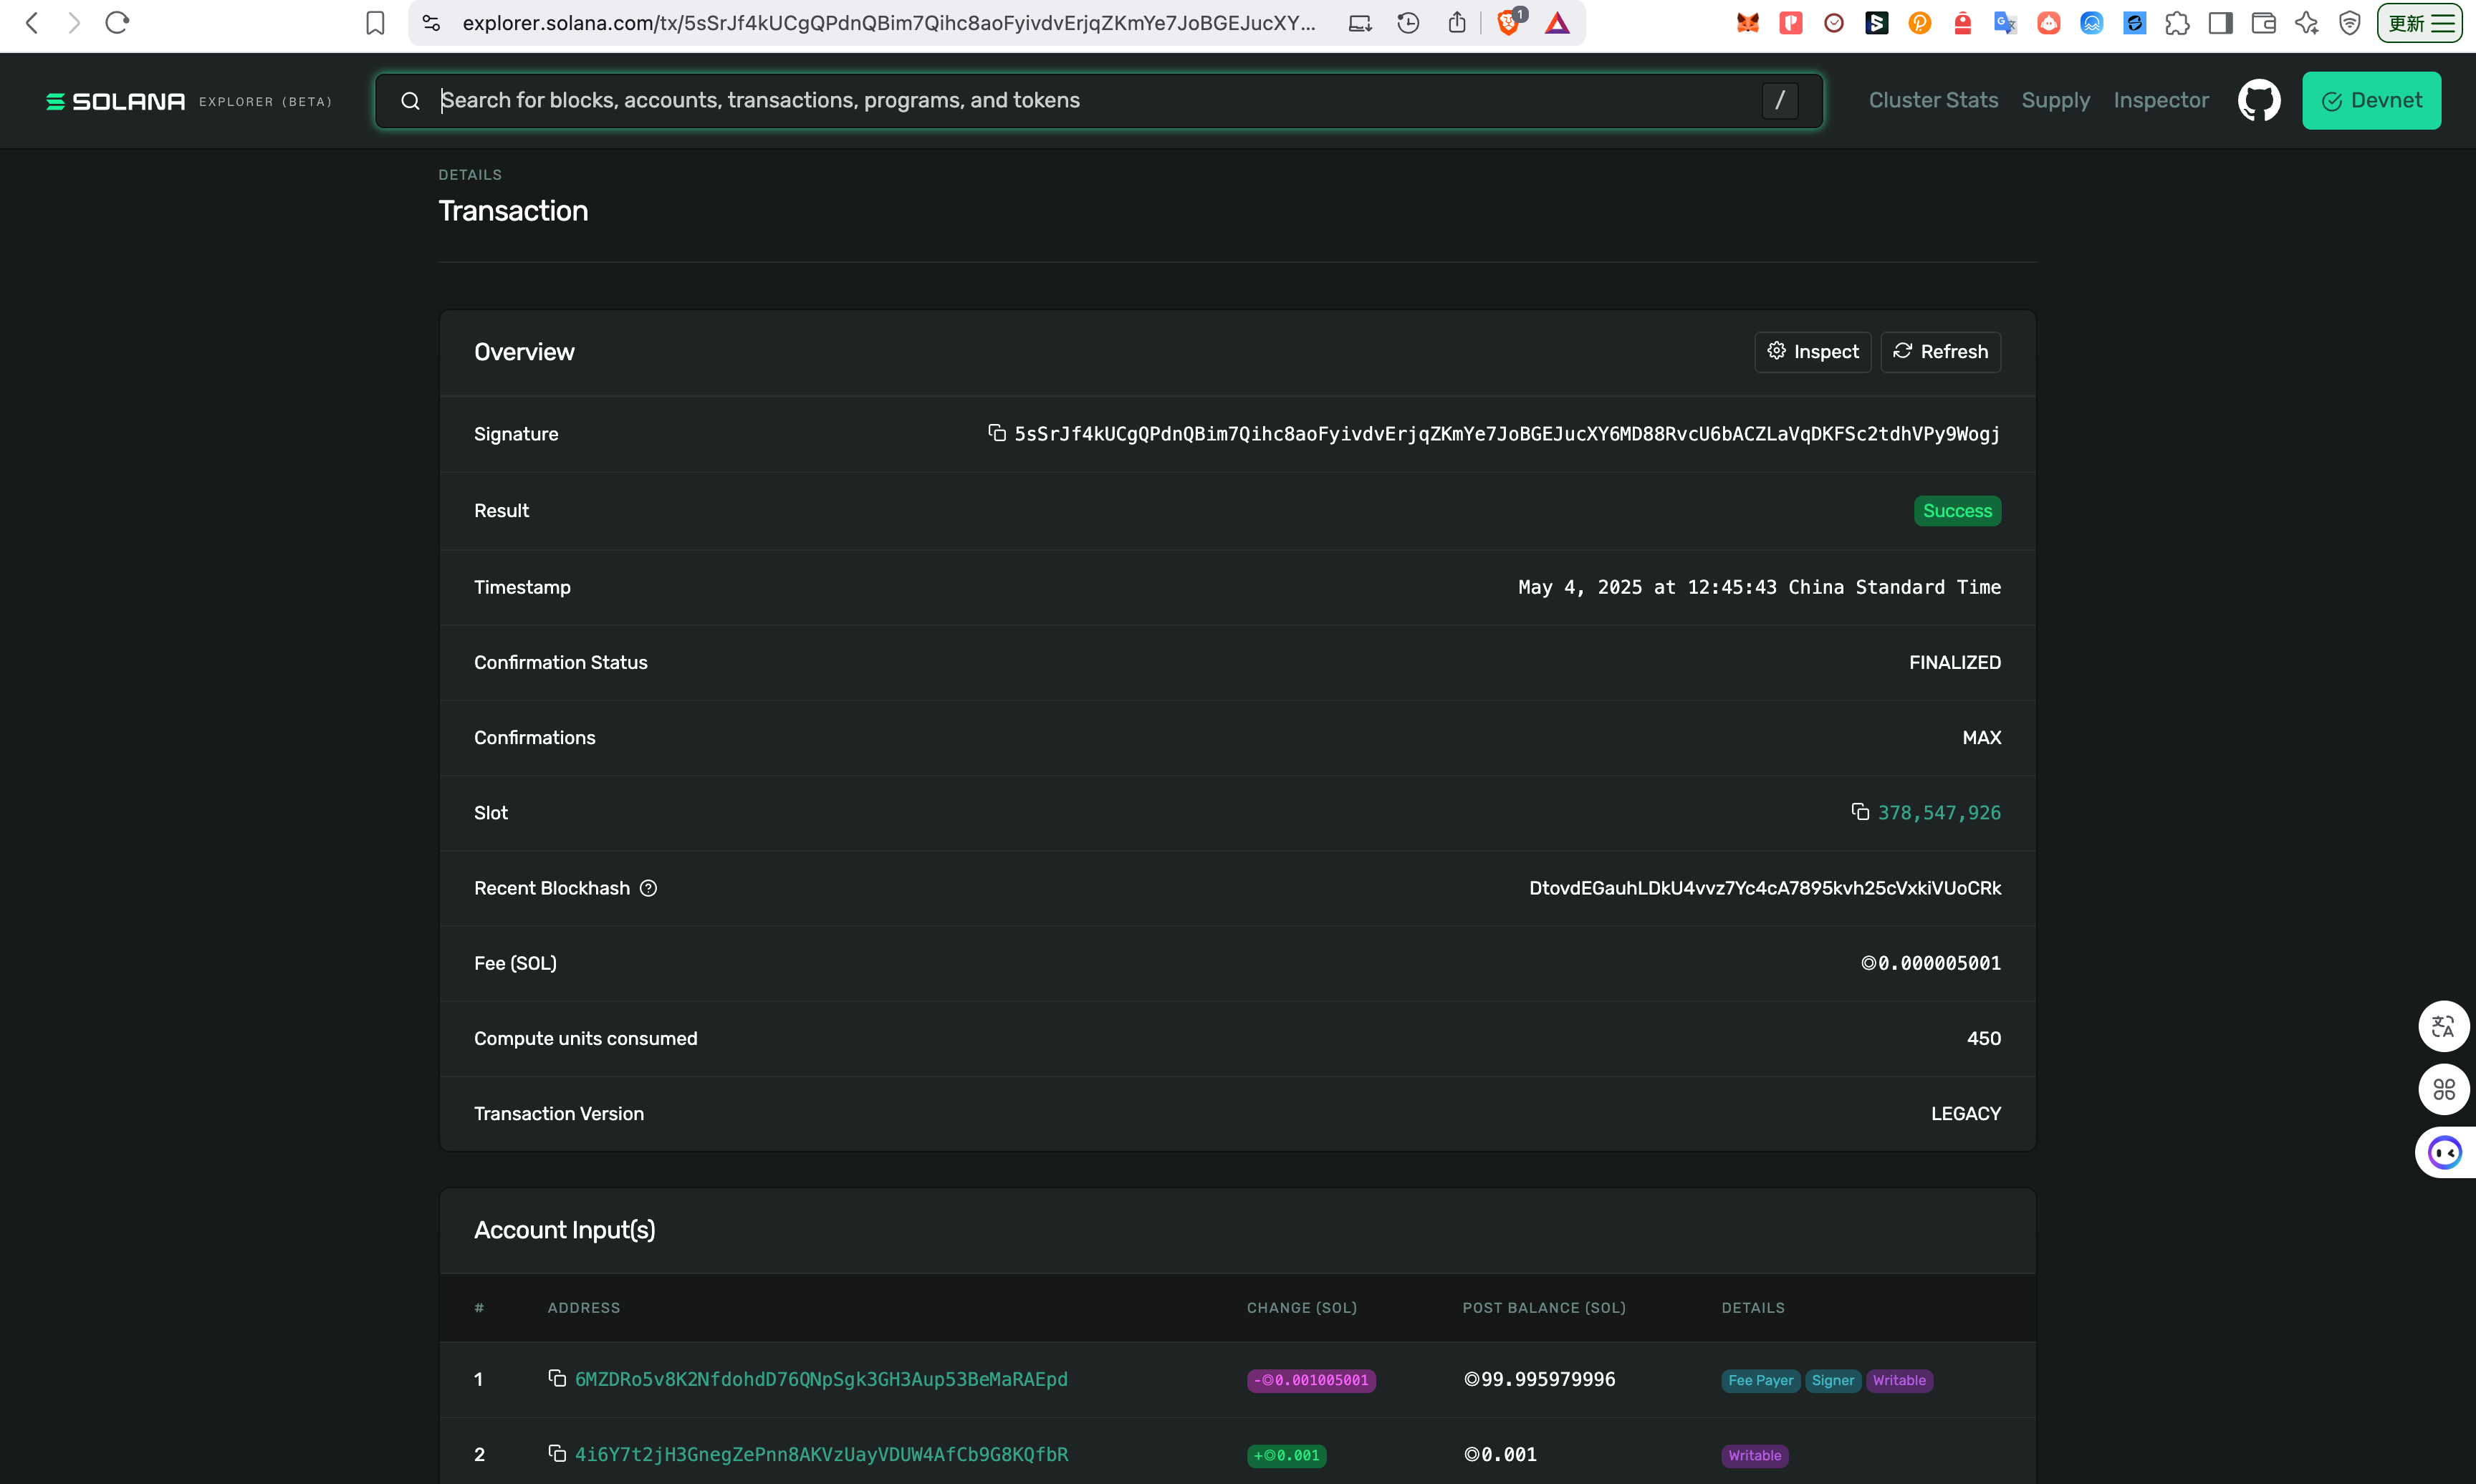
这段代码展示了使用 TypeScript 和 gill 库在 Solana 区块链上执行 SOL 代币转账的流程,适用于测试网环境。首先,导入 gill 库的模块以支持 Solana 客户端创建、密钥对生成、交易构建和签名。通过指定的 RPC URL 创建 Solana 客户端,并获取最新区块哈希以构建有效交易。从文件中加载签名者的密钥对,并生成随机接收者地址。交易通过 createTransaction 构建,包含一笔将 0.001 SOL(即 1,000,000 lamports,1 SOL = 10^9 lamports)从签名者转账到接收者的指令,设置计算单位限制和价格。交易经签名者签名并编码为字节格式后,通过 sendAndConfirmTransaction 发送到网络并等待确认。成功后,输出交易的 Solana 浏览器链接;若失败,则捕获并打印错误信息。该代码清晰展示了 Solana 转账的基本步骤,适合开发和测试用途。
运行测试 TypeScript 脚本
这条命令用于 直接执行 TypeScript 文件(withGill.ts),无需手动编译成 JavaScript
SolanaSandbox/solana-raw-tx on main [?] is 📦 1.0.0 via ⬢ v23.11.0 took 3.8s
➜ solana address
6MZDRo5v8K2NfdohdD76QNpSgk3GH3Aup53BeMaRAEpd
SolanaSandbox/solana-raw-tx on main [?] is 📦 1.0.0 via ⬢ v23.11.0
➜ npx tsx withGill.ts
Signer address: 6MZDRo5v8K2NfdohdD76QNpSgk3GH3Aup53BeMaRAEpd
Raw transaction bytes: Uint8Array(267) [
1, 243, 146, 8, 134, 24, 244, 59, 215, 37, 172, 50,
89, 63, 57, 124, 199, 177, 130, 240, 27, 65, 161, 107,
121, 209, 219, 235, 58, 92, 243, 113, 5, 208,
201, 205, 101, 217, 245, 11, 86, 30, 180, 69, 230, 110,
51, 127, 8, 203,
... 167 more items
]
Explorer link: https://explorer.solana.com/tx/5sSrJf4kUCgQPdnQBim7Qihc8aoFyivdvErjqZKmYe7JoBGEJucXY6MD88RvcU6bACZLaVqDKFSc2tdhVPy9Wogj?cluster=devnet
Transaction confirmed!
命令组成
| 部分 | 说明 |
|---|---|
npx |
Node.js 自带的工具,用于临时安装并运行 npm 包(无需全局安装)。 |
tsx |
一个 TypeScript 运行时,类似 ts-node,可直接执行 .ts 文件。 |
withGill.ts |
要执行的 TypeScript 文件(你的脚本文件)。 |
对比其他工具
| 工具 | 特点 |
|---|---|
tsx |
零配置、快、无缓存文件,适合临时执行。 |
ts-node |
功能更全(支持 REPL、缓存),但需要配置 tsconfig.json。 |
node + .js |
需先用 tsc 编译 TS 为 JS,再运行。 |
总结
通过本教程,你已掌握用 Gill 库在 Solana 测试网上实现 SOL 代币转账的核心技能。从项目配置到交易验证,Web3 开发的潜力在你手中展现。Gill 库的兼容性与 Solana 的高效性能,为你打开了区块链开发的广阔天地。继续探索 Solana 官方文档和 Gill 仓库,打造属于你的 Web3 未来!
参考
- https://explorer.solana.com/tx/5sSrJf4kUCgQPdnQBim7Qihc8aoFyivdvErjqZKmYe7JoBGEJucXY6MD88RvcU6bACZLaVqDKFSc2tdhVPy9Wogj?cluster=devnet
- https://solana.com/zh/docs/core/transactions
- https://shyft.to/dashboard/overview
- https://soldev.cn/topics/14
- https://triton.one/
- https://github.com/solana-foundation/gill


