构建一个实时的 Hyperliquid 巨鲸预警机器人
- QuickNode
- 发布于 2025-08-29 18:28
- 阅读 2950
本文介绍了如何使用 QuickNode Webhooks 在 Hyperliquid 区块链上创建一个 HYPE 代币的实时巨鲸预警机器人。
概述
监控链上大量 token 的移动,通常被称为 “巨鲸” 活动,可以提供对市场情绪和潜在价格行为的宝贵见解。
本指南将引导你为 Hyperliquid 区块链上的 HYPE token 创建一个实时巨鲸预警机器人。你将构建一个系统,不仅可以检测到大型转账,还可以通过 HyperCore 获取的实时美元价格来丰富数据,并将即时通知发送到 Telegram 频道。为了实现这一点,我们将利用 QuickNode Webhooks 的强大功能和效率。
你将做什么
- 创建一个 QuickNode Webhook,用于过滤 Hyperliquid EVM 的 HYPE
Transfer事件 - 在处理之前,使用 HMAC 签名验证 payload 的真实性
- 通过 HyperEVM 预编译从 HyperCore 读取 HYPE 现货 价格
- 向 Telegram 频道发送分级巨鲸警报(小鱼、海豚、鲸鱼)
你需要什么
- 一个带有 Hyperliquid EVM endpoint 的 QuickNode 账户
- Node.js 20+,npm(或其他包管理器)以及像 VS Code 这样的代码编辑器
- Telegram 账户(如果你想构建一个 Telegram 机器人)
- JavaScript 的基本知识
- 用于将本地服务器暴露到互联网的工具,例如 ngrok 或 localtunnel (如果你需要在本地测试 webhooks)
为什么选择 QuickNode Webhooks?
QuickNode Webhooks 以 “推送” 模型运行。你无需反复向区块链请求新数据(轮询),Webhooks 会为你监控链,并在事件发生时立即将相关数据推送到你的应用程序。
这种方法非常高效,并提供以下几个关键优势:
- 实时数据:立即收到通知,没有轮询周期的延迟。
- 降低开销:使你无需管理复杂且资源密集型的轮询基础设施。
- 强大的过滤:在 QuickNode 端处理和过滤数据,因此你的服务器只会收到它需要的确切信息。
- 经济高效:只需为交付的每个事件付费,使其成为实时数据监控的经济实惠的解决方案。
巨鲸预警机器人项目
巨鲸预警机器人由几个相互连接的组件组成,这些组件协同工作以提供实时通知:
-
Hyperliquid 区块链:当发生转账时,会为 HYPE token 发出一个
Transfer事件(Transfer(address,address,uint256))。 -
带有过滤功能的 QuickNode Webhooks:Webhook 不断监控链,并根据我们定义的过滤器功能捕获此事件。
-
Webhook 交付: QuickNode 通过安全的 POST 请求将过滤后的 payload 发送到我们的服务器 endpoint。
-
Node.js 服务器:我们的服务器接收数据,使用 webhook 的安全Token验证其真实性,并对其进行处理。
-
价格获取:服务器调用 Hyperliquid 上的 HyperCore 预编译合约以获取 HYPE 的当前美元价格。
-
Telegram 机器人:最后,服务器格式化丰富且可读的消息,并使用 Telegram Bot API 将警报发送到我们指定的频道。

这是我们将要实现的端到端事件流。现在,让我们开始构建 Hyperliquid 巨鲸预警机器人。
步骤 1:创建你的 Telegram 机器人和频道
首先,你需要一个 Telegram 机器人和一个可以发布警报的频道。
使用 BotFather 创建机器人
- 打开 Telegram 并搜索 BotFather。
- 开始与 BotFather 的聊天,并使用命令
/newbot创建一个新机器人。 - 按照提示设置机器人的名称和用户名。
- BotFather 将为你提供一个机器人Token。安全地保存此Token;你需要它用于你的
.env文件。
创建一个频道
- 在 Telegram 中,创建一个新频道。你可以将其设置为公开或私有。
- 对于公共频道,为其指定一个令人难忘的用户名(例如,@hyperliquid_whales)。此用户名是你的
TELEGRAM_CHANNEL_ID。 - 对于私人频道,你需要它的数字 Chat ID。你可以通过将频道中的消息转发到像
@JsonDumpCUBot这样的机器人来获取此 ID,并检查它提供的 chat ID(即,forward_from_chat.id)。
将你的机器人添加到频道
- 打开新创建的频道的设置。
- 添加你的机器人并使其成为管理员。
你现在拥有 TELEGRAM_BOT_TOKEN 和 TELEGRAM_CHANNEL_ID。
步骤 2:创建你的 QuickNode Hyperliquid EVM Endpoint
现在,创建你的 QuickNode Hyperliquid EVM endpoint,该 endpoint 将用于与 Hyperliquid Core 交互以获取 HYPE 价格数据。
首先,你需要一个 QuickNode 账户。 如果你已经有了一个,只需登录即可。 进入 QuickNode 仪表板后:
- 导航到 Endpoints 页面
- 点击 New Endpoint 按钮
- 选择 Hyperliquid EVM Mainnet 网络
- 创建你的 endpoint
创建 endpoint 后,复制你的 endpoint URL 并妥善保管。 在后面的步骤中,你需要将其添加到你的 .env 文件中。
步骤 3:创建你的 QuickNode Webhook
现在,让我们设置将监控 Hyperliquid 区块链的 QuickNode Webhook。
创建 Webhook
- 转到 QuickNode 仪表板,然后导航到 Webhooks 部分。
- 单击 Create Webhook,然后选择 Hyperliquid EVM Mainnet 作为区块链。
- 选择 Start with a custom filter 以创建自定义过滤器。
定义你的自定义过滤器
QuickNode 提供了几个用于常见用例的 预定义过滤器模板。 对于本指南,我们将创建一个自定义 JavaScript 函数来实现我们的分层警报逻辑。
我们将使用的函数检查每个新区块中的每个交易。 它专门查找与标准 ERC20 Transfer 签名(0xddf252ad1be2c89b69c2b068fc378daa952ba7f163c4a11628f55a4df523b3ef)匹配并且源自 HYPE token 合约的事件日志。 对于 Transfer 事件,topics 数组包含发送者和接收者,而 log.data 包含金额。 我们的代码会解码此信息,根据我们的阈值检查金额,并且仅当转账足够大时才返回干净的数据 payload。 这种预处理非常有效,可确保我们的服务器不会将资源浪费在不相关的数据上。
在函数框中,粘贴以下代码:
// QuickNode Stream Filter for Tiered Wrapped HYPE Token Transfers
// 用于分层包装 HYPE Token 转账的 QuickNode Stream 过滤器
function main(payload) {
  // --- Configuration ---
  // The specific token contract address for Wrapped HYPE
  // 包装 HYPE 的特定 token 合约地址
  const WHYPE_ADDRESS = "0x5555555555555555555555555555555555555555";

  // Define the thresholds for each tier (with 18 decimals)
  // 定义每个级别的阈值(具有 18 位小数)
  const TIER_THRESHOLDS = {
    whale: BigInt("10000000000000000000000"), // 10,000 HYPE
    dolphin: BigInt("5000000000000000000000"), // 5,000 HYPE
    small_fish: BigInt("1000000000000000000000"), // 1,000 HYPE
  };

  // --- Static Data ---
  // 静态数据
  const TRANSFER_SIGNATURE =
    "0xddf252ad1be2c89b69c2b068fc378daa952ba7f163c4a11628f55a4df523b3ef";

  const { data } = payload;
  const block = data[0].block;
  const receipts = data[0].receipts || [];

  const categorizedTransfers = [];

  const blockNumber = parseInt(block.number, 16);
  const blockTimestamp = parseInt(block.timestamp, 16);

  for (const receipt of receipts) {
    for (const log of receipt.logs || []) {
      // Primary filter: Is this a Transfer event from the W-HYPE contract?
      // 主要过滤器:这是否是来自 W-HYPE 合约的 Transfer 事件?
      if (
        log.address.toLowerCase() === WHYPE_ADDRESS &&
        log.topics[0] === TRANSFER_SIGNATURE
      ) {
        const transferValue = BigInt(log.data);
        let tier = null;

        // Tiering Logic: Check from the highest threshold down to the lowest.
        // 分层逻辑:从最高阈值降到最低阈值进行检查。
        if (transferValue >= TIER_THRESHOLDS.whale) {
          tier = "whale";
        } else if (transferValue >= TIER_THRESHOLDS.dolphin) {
          tier = "dolphin";
        } else if (transferValue >= TIER_THRESHOLDS.small_fish) {
          tier = "small_fish";
        }

        // If the transfer meets any of our thresholds, process it.
        // 如果转账满足我们任何阈值,请对其进行处理。
        if (tier) {
          const fromAddress = "0x" + log.topics[1].slice(26);
          const toAddress = "0x" + log.topics[2].slice(26);

          categorizedTransfers.push({
            tier: tier,
            tokenContract: log.address,
            from: fromAddress,
            to: toAddress,
            value: transferValue.toString(),
            transactionHash: receipt.transactionHash,
            blockNumber: blockNumber,
            timestamp: blockTimestamp,
          });
        }
      }
    }
  }

  if (categorizedTransfers.length > 0) {
    return {
      largeTransfers: categorizedTransfers,
    };
  }

  return null;
}
测试你的过滤器
选择一个区块(例如 12193297)来测试你的过滤器条件并验证警报是否正确触发。 你应该会看到一个包含分类转账的 payload,如下所示:
{
  "largeTransfers": [\
    {\
      "blockNumber": 12193297,\
      "from": "0x7c97cd7b57b736c6ad74fae97c0e21e856251dcf",\
      "tier": "small_fish",\
      "timestamp": 1756245832,\
      "to": "0xaaa2851ec59f335c8c6b4db6738c94fd0305598a",\
      "tokenContract": "0x5555555555555555555555555555555555555555",\
      "transactionHash": "0xafe522067fca99d4b44030d82885cabb757943255b991b3f2e95564807dbe0f7",\
      "value": "2200000000000000000000"\
    }\
  ]\
}
获取安全Token并设置 Webhook URL
QuickNode 将自动生成一个 安全Token 来验证传入请求的真实性。 将此Token复制到你的 .env 文件中,作为 WEBHOOK_SECRET 变量的值。
对于 Webhook URL,你需要一个可公开访问的 endpoint。 在开发过程中,你可以使用 ngrok 或 localtunnel 来暴露你的本地服务器。 你可以运行 ngrok http 3000 (假设你的服务器在端口 3000 上运行),并在服务器运行后复制 HTTPS 转发 URL。 记住在其后附加 /webhook(例如,https://your-ngrok-id.ngrok.io/webhook),因为这是你将构建 webhook 侦听器的地方。
由于我们的服务器尚未构建,我们将在此处暂停,并在构建服务器后返回以测试和激活 Webhook。
步骤 4:构建 Webhook 服务器
现在,让我们创建将接收和处理来自我们的 webhook 的数据的 Node.js 应用程序。
项目设置和依赖项
首先,为你的项目创建一个目录并安装必要的依赖项。 你可以使用 npm 或任何其他包管理器(例如 yarn、pnpm、bun)来执行此操作。 例如:
mkdir hyperliquid-whale-alert-bot && cd hyperliquid-whale-alert-bot
npm init -y
npm i express dotenv node-telegram-bot-api viem
npm i -D nodemon
然后,更新你的 package.json 以包含以下内容:
"type": "module",
"scripts": {
  "start": "node index.js",
  "dev": "nodemon index.js"
}
项目结构
创建以下文件,为你的项目提供基本结构:
├── config.js           // Configuration settings
├── index.js            // Main entry point
├── priceService.js     // Price-related logic
├── security.js         // Security-related logic
├── telegramService.js  // Telegram bot integration
└── .env                // Environment variables
└── .gitignore          // Git ignore file
这是你可以在终端中运行以立即创建所有这些文件的一行命令:
touch config.js index.js priceService.js security.js telegramService.js .env .gitignore

## If touch command is not available, you can use:
## (如果触摸命令不可用,你可以使用:
## (echo > config.js) && (echo > index.js) && (echo > priceService.js) && (echo > security.js) && (echo > telegramService.js) && (echo > .env) && (echo > .gitignore)
环境变量
更新项目根目录中的 .env 文件以存储你的环境变量。 添加以下变量:
## Telegram Configuration
# Telegram 配置
TELEGRAM_BOT_TOKEN=your_telegram_bot_token
TELEGRAM_CHANNEL_ID=your_channel_id

## Server Configuration
# 服务器配置
PORT=3000

## Webhook Security
# Webhook 安全性
WEBHOOK_SECRET=your_optional_webhook_secret

## QuickNode Configuration for Hyperliquid EVM RPC
# 用于 Hyperliquid EVM RPC 的 QuickNode 配置
HYPERLIQUID_RPC=https://your-endpoint.quiknode.pro/your-token/

## Environment
# 环境
NODE_ENV=development
代码实现
.gitignore
重要的是在你的项目中添加一个 .gitignore 文件,以避免提交敏感信息和不必要的文件。 在项目的根目录中创建一个 .gitignore 文件,并添加以下行:
node_modules
.env
config.js
此文件包含应用程序的配置设置,包括环境变量和其他常量。
现货 价格预编译位于 0x...0808,而 oracle 价格预编译是 0x...0807。 你可以使用任意一个,具体取决于你的价格来源; 本指南使用 现货。 始终在官方文档和最新的指南中确认地址。
import dotenv from "dotenv";

// Load environment variables
// 加载环境变量
dotenv.config();

export const TIERS = {
  whale: {
    emoji: "🐋",
    label: "WHALE",
  },
  dolphin: {
    emoji: "🐬",
    label: "DOLPHIN",
  },
  small_fish: {
    emoji: "🐟",
    label: "FISH",
  },
};

export const EXPLORER = {
  tx: "https://hypurrscan.io/tx/",
  address: "https://hypurrscan.io/address/",
  block: "https://hypurrscan.io/block/",
};

export const HYPERCORE = {
  SPOT_PX_PRECOMPILE: "0x0000000000000000000000000000000000000808",
  HYPE_SPOT_INDEX: 107, // Mainnet HYPE spot ID
  // Mainnet HYPE 现货 ID
  RPC_URL: process.env.HYPERLIQUID_RPC || "https://api.hyperliquid.xyz/evm",
};

export const MESSAGE_DELAY_MS = 1000; // Delay between Telegram messages
// Telegram 消息之间的延迟

export const PORT = process.env.PORT || 3000;
priceService.js
此服务负责从 HyperCore 获取 HYPE 价格。
我们将使用 32 字节的 ABI 编码索引直接调用 SPOT 价格预编译。 预编译返回一个 uint64,其中小数缩放取决于资产的 szDecimals(Hyperliquid 的价格系统)。
// priceService.js
// 从 HyperCore 使用预编译获取 HYPE 价格

import { createPublicClient, http, encodeAbiParameters, formatUnits } from "viem";
import { HYPERCORE } from "./config.js";

// Create viem client for HyperEVM
// 为 HyperEVM 创建 viem 客户端
const client = createPublicClient({
  transport: http(HYPERCORE.RPC_URL),
});

// Cache price for 30 seconds to avoid excessive RPC calls
// 缓存价格 30 秒以避免过多的 RPC 调用
let priceCache = {
  price: null,
  timestamp: 0,
};
const CACHE_DURATION = 30000; // 30 seconds
// 30 秒

/**
 * Fetches HYPE spot price from HyperCore precompile
 * 从 HyperCore 预编译获取 HYPE 现货价格
 * Price is returned with 6 decimals precision for HYPE
 * 返回的价格对于 HYPE 具有 6 位小数的精度
 * Details: To convert to floating point numbers, divide the returned price by 10^(8 - base asset szDecimals) for spot
 * 详细信息:要转换为浮点数,请将返回的价格除以 10^(8 - 基础资产 szDecimals) 以获取现货
 * Source: https://hyperliquid.gitbook.io/hyperliquid-docs/for-developers/hyperevm/interacting-with-hypercore
 * 来源:https://hyperliquid.gitbook.io/hyperliquid-docs/for-developers/hyperevm/interacting-with-hypercore
 * @returns {Promise<number|null>} HYPE price in USD
 * @returns {Promise<number|null>} 以美元计价的 HYPE 价格
 */
export async function getHypePrice() {
  try {
    // Check cache first
    // 首先检查缓存
    if (
      priceCache.price &&
      Date.now() - priceCache.timestamp < CACHE_DURATION
    ) {
      console.log("Using cached HYPE price:", priceCache.price);
      console.log("使用缓存的 HYPE 价格:", priceCache.price);
      return priceCache.price;
    }

    // Encode the spot index as a uint32 parameter
    // 将现货索引编码为 uint32 参数
    const encodedIndex = encodeAbiParameters(
      [{ name: "index", type: "uint32" }],
      [HYPERCORE.HYPE_SPOT_INDEX]
    );

    // Call the spot price precompile
    // 调用现货价格预编译
    const result = await client.call({
      to: HYPERCORE.SPOT_PX_PRECOMPILE,
      data: encodedIndex,
    });

    // szDecimals for HYPE is 2.
    // HYPE 的 szDecimals 为 2。
    const szDecimals = 2;

    const priceRaw = BigInt(result.data);
    const price = formatUnits(priceRaw, 8 - szDecimals); // Convert to decimal string
    // 转换为十进制字符串

    // Update cache
    // 更新缓存
    priceCache = {
      price,
      timestamp: Date.now(),
    };

    console.log(`Fetched HYPE price from HyperCore: $${price}`);
    console.log(`从 HyperCore 获取的 HYPE 价格:$${price}`);
    return price;
  } catch (error) {
    console.error("Error fetching HYPE price from HyperCore:", error);
    console.error("从 HyperCore 获取 HYPE 价格时出错:", error);
    // Return cached price if available, otherwise null
    // 如果有可用的缓存价格则返回,否则返回 null
    return priceCache.price || null;
  }
}

/**
 * Formats USD value based on HYPE amount and price
 * 根据 HYPE 数量和价格格式化美元价值
 * @param {string} hypeAmount - HYPE amount as string
 * @param {string} hypeAmount - 作为字符串的 HYPE 数量
 * @param {number} hypePrice - HYPE price in USD
 * @param {number} 以美元计价的 HYPE 价格
 * @returns {string} Formatted USD value
 * @returns {string} 格式化的美元价值
 */
export function formatUSD(hypeAmount, hypePrice) {
  if (!hypePrice) return "";

  const usdValue = parseFloat(hypeAmount) * hypePrice;
  return `($${usdValue.toLocaleString("en-US", {
    minimumFractionDigits: 0,
    maximumFractionDigits: 0,
  })})`;
}
security.js
此模块包含验证传入 webhooks 的逻辑。 QuickNode 建议使用 headers X-QN-Nonce、X-QN-Timestamp 和 X-QN-Signature 进行 HMAC 验证,并且此模块实现了该验证。
有关 QuickNode 的 webhook 安全性的更多详细信息,请参阅 验证 Streams 签名 指南。 由于 Webhooks 和 Streams 共享相同的底层基础架构,因此相同的原则适用。
// security.js
// 验证来自 QuickNode 的传入 webhook 签名

import crypto from "crypto";

/**
 * Validates the webhook signature from QuickNode
 * 验证来自 QuickNode 的 webhook 签名
 * Based on QuickNode's HMAC-SHA256 signature validation
 * 基于 QuickNode 的 HMAC-SHA256 签名验证
 *
 * @param {string} secretKey - The webhook secret key
 * @param {string} secretKey - webhook 密钥
 * @param {string} payload - The request body as string
 * @param {string} payload - 作为字符串的请求正文
 * @param {string} nonce - The nonce from headers
 * @param {string} nonce - 来自 headers 的 nonce
 * @param {string} timestamp - The timestamp from headers
 * @param {string} timestamp - 来自 headers 的时间戳
 * @param {string} givenSignature - The signature from headers
 * @param {string} givenSignature - 来自 headers 的签名
 * @returns {boolean} Whether the signature is valid
 * @returns {boolean} 签名是否有效
 */
export function validateWebhookSignature(
  secretKey,
  payload,
  nonce,
  timestamp,
  givenSignature
) {
  if (!secretKey || !nonce || !timestamp || !givenSignature) {
    console.warn("⚠️  Missing required parameters for signature validation");
    console.warn("⚠️  缺少签名验证的必需参数");
    return false;
  }

  try {
    // Concatenate nonce + timestamp + payload as strings
    // 将 nonce + timestamp + payload 连成字符串
    const signatureData = nonce + timestamp + payload;

    // Convert to bytes
    // 转换为字节
    const signatureBytes = Buffer.from(signatureData);

    // Create HMAC with secret key converted to bytes
    // 使用转换为字节的密钥创建 HMAC
    const hmac = crypto.createHmac("sha256", Buffer.from(secretKey));
    hmac.update(signatureBytes);
    const computedSignature = hmac.digest("hex");

    // Use timing-safe comparison to prevent timing attacks
    // 使用时间安全比较来防止时间攻击
    const isValid = crypto.timingSafeEqual(
      Buffer.from(computedSignature, "hex"),
      Buffer.from(givenSignature, "hex")
    );

    if (isValid) {
      console.log("✅ Webhook signature validated successfully");
      console.log("✅ Webhook 签名已成功验证");
    } else {
      console.error("❌ Invalid webhook signature");
      console.error("❌ 无效的 webhook 签名");
    }

    return isValid;
  } catch (error) {
    console.error("Error validating webhook signature:", error);
    console.error("验证 webhook 签名时出错:", error);
    return false;
  }
}

/**
 * Middleware for Express to validate webhook signatures
 * 用于 Express 的中间件,用于验证 webhook 签名
 * QuickNode sends nonce, timestamp, and signature in headers
 * QuickNode 在 headers 中发送 nonce、时间戳和签名
 */
export function webhookAuthMiddleware(req, res, next) {
  // Skip validation if no secret is configured
  // 如果未配置密钥,则跳过验证
  const secretKey = process.env.WEBHOOK_SECRET;
  if (!secretKey) {
    console.log("ℹ️  Webhook secret not configured, skipping validation");
    console.log("ℹ️  未配置 Webhook 密钥,跳过验证");
    return next();
  }

  // Get QuickNode headers
  // 获取 QuickNode headers
  const nonce = req.headers["x-qn-nonce"];
  const timestamp = req.headers["x-qn-timestamp"];
  const givenSignature = req.headers["x-qn-signature"];

  if (!nonce || !timestamp || !givenSignature) {
    console.error("🚫 Missing required QuickNode headers");
    console.error("🚫 缺少必需的 QuickNode headers");
    return res.status(400).json({
      error: "Missing required headers",
      message:
        "x-qn-nonce, x-qn-timestamp, and x-qn-signature headers are required",
        // 需要 x-qn-nonce、x-qn-timestamp 和 x-qn-signature headers
    });
  }

  // Get the raw body as string
  // 以字符串形式获取原始正文
  // Note: Express's JSON middleware already parsed the body, so we need to stringify it back
  // 注意:Express 的 JSON 中间件已经解析了正文,因此我们需要将其字符串化
  const payloadString = JSON.stringify(req.body);

  // Validate the signature
  // 验证签名
  const isValid = validateWebhookSignature(
    secretKey,
    payloadString,
    nonce,
    timestamp,
    givenSignature
  );

  if (!isValid) {
    console.error("🚫 Webhook validation failed");
    console.error("🚫 Webhook 验证失败");
    return res.status(401).json({
      error: "Invalid signature",
      message: "The webhook signature could not be validated",
      // 无法验证 webhook 签名
    });
  }

  next();
}
telegramService.js
此模块格式化最终消息并将其发送到你的 Telegram 频道。
// telegramService.js
// 处理 Telegram 机器人消息传递

import TelegramBot from "node-telegram-bot-api";
import { formatEther } from "viem";
import { TIERS, EXPLORER, MESSAGE_DELAY_MS } from "./config.js";
import { getHypePrice, formatUSD } from "./priceService.js";

// Initialize Telegram bot
// 初始化 Telegram 机器人
const bot = new TelegramBot(process.env.TELEGRAM_BOT_TOKEN, { polling: false });
const CHANNEL_ID = process.env.TELEGRAM_CHANNEL_ID;

/**
 * Format an address for display
 * 格式化地址以进行显示
 */
function formatAddress(address) {
  return `${address.slice(0, 6)}...${address.slice(-4)}`;
}

/**
 * Format transaction hash for display
 * 格式化交易哈希以进行显示
 */
function formatTxHash(hash) {
  return `${hash.slice(0, 10)}...`;
}

/**
 * Display time
 * 显示时间
 */
function getTime(timestamp) {
  const date = new Date(timestamp * 1000);
  return date.toLocaleString("en-US");
}

/**
 * Create formatted Telegram message for a transfer
 * 为转账创建格式化的 Telegram 消息
 */
async function createMessage(transfer) {
  const tierConfig = TIERS[transfer.tier];
  const formattedValue = formatEther(BigInt(transfer.value));
  const hypePrice = await getHypePrice();
  const usdValue = formatUSD(formattedValue, hypePrice);

  // Create message with Markdown formatting
  // 使用 Markdown 格式创建消息
  const message = `
${tierConfig.emoji} **${tierConfig.label} ALERT** ${tierConfig.emoji}

💰 **Amount:** \`${parseFloat(formattedValue).toLocaleString("en-US", {
    maximumFractionDigits: 2,
  })} HYPE\` ${usdValue}

📤 **From:** [${formatAddress(transfer.from)}](${EXPLORER.address}${
    transfer.from
  })
📥 **To:** [${formatAddress(transfer.to)}](${EXPLORER.address}${transfer.to})

🔗 **TX:** [${formatTxHash(transfer.transactionHash)}](${EXPLORER.tx}${
    transfer.transactionHash
  })
📦 **Block:** [#${transfer.blockNumber}](${EXPLORER.block}${transfer.blockNumber})
⏰ **Time:** ${getTime(transfer.timestamp)}

Powered by [Hyperliquid](https://hyperliquid.xyz) & [QuickNode Webhooks](https://www.quicknode.com/webhooks)`;

  return message;
}

/**
 * Send message to Telegram with retry logic
 * 使用重试逻辑向 Telegram 发送消息
 */
export async function sendMessage(message, retries = 3) {
  for (let i = 0; i < retries; i++) {
    try {
      await bot.sendMessage(CHANNEL_ID, message, {
        parse_mode: "Markdown",
        disable_web_page_preview: true,
      });

      console.log("✅ Message sent to Telegram successfully");
      console.log("✅ 消息已成功发送到 Telegram");
      return true;
    } catch (error) {
      console.error(`❌ Telegram send attempt ${i + 1} failed:`, error.message);
      console.error(`❌ Telegram 发送尝试 ${i + 1} 失败:`, error.message);

      if (i < retries - 1) {
        // Wait before retrying (exponential backoff)
        // 在重试之前等待(指数退避)
        await new Promise((resolve) =>
          setTimeout(resolve, 1000 * Math.pow(2, i))
        );
      }
    }
  }

  return false;
}

/**
 * Process and send alerts to Telegram
 * 处理警报并将其发送到 Telegram
 */
export async function processAlerts(transfers) {
  console.log(`📨 Processing ${transfers.length} transfers for Telegram...`);
  console.log(`📨 正在处理 ${transfers.length} 个用于 Telegram 的转账...`);

  for (const transfer of transfers) {
    const message = await createMessage(transfer);
    const sent = await sendMessage(message);

    if (!sent) {
      console.error(
        "Failed to send message for transfer:",
        transfer.transactionHash
      );
      console.error(
        "未能发送转账消息:",
        transfer.transactionHash
      );
    }

    // Rate limiting between messages
    // 消息之间的速率限制
    if (transfers.indexOf(transfer) < transfers.length - 1) {
      await new Promise((resolve) => setTimeout(resolve, MESSAGE_DELAY_MS));
    }
  }

  // Send summary if there are multiple transfers
  // 如果有多个转账,则发送摘要
  if (transfers.length > 3) {
    const summaryMessage = `
📊 **Batch Summary**

Total transfers: ${transfers.length}
** 总转账数量:** ${transfers.length}
🐋 Whales: ${transfers.filter((t) => t.tier === "whale").length}
** 鲸鱼:** ${transfers.filter((t) => t.tier === "whale").length}
🐬 Dolphins: ${transfers.filter((t) => t.tier === "dolphin").length}
** 海豚:** ${transfers.filter((t) => t.tier === "dolphin").length}
🐟 Fish: ${transfers.filter((t) => t.tier === "small_fish").length}
** 鱼:** ${transfers.filter((t) => t.tier === "small_fish").length}

Block: #${transfers[0].blockNumber}
** 区块:** #${transfers[0].blockNumber}
`;
    await sendMessage(summaryMessage);
  }
}
index.js
这是将所有内容整合在一起的主文件。
我们在任何 JSON 中间件之前为 /webhook endpoint 使用 Express 原始正文解析器,以便能够验证签名。 这确保了正文以其原始形式提供,以用于 HMAC 验证。
// server.js
// 用于 Hyperliquid 巨鲸警报的主要 webhook 服务器

import express from "express";
import dotenv from "dotenv";
import { PORT, HYPERCORE } from "./config.js";
import { processAlerts } from "./telegramService.js";
import { webhookAuthMiddleware } from "./security.js";

// Load environment variables
// 加载环境变量
dotenv.配置:
- Telegram Bot: ${
    process.env.TELEGRAM_BOT_TOKEN ? "✅ 已配置" : "❌ 未配置"
  }
- Telegram 频道: ${process.env.TELEGRAM_CHANNEL_ID || "未配置"}
- Webhook 密钥: ${
    process.env.WEBHOOK_SECRET
      ? "✅ 已配置"
      : "⚠️  未配置 (验证已禁用)"
  }
- HyperCore RPC: ${HYPERCORE.RPC_URL}

准备好接收 webhooks...
  `);
});

// 优雅关机
process.on("SIGTERM", () => {
  console.log("收到 SIGTERM,正在优雅关机...");
  process.exit(0);
});

process.on("SIGINT", () => {
  console.log("收到 SIGINT,正在优雅关机...");
  process.exit(0);
});
第 5 步:运行和测试系统
现在你可以启动你的机器人了。
启动你的服务器
在你的终端中运行以下命令来启动服务器。nodemon 允许服务器在文件更改时自动重启。
## 使用 nodemon 在开发模式下启动
npm run dev
暴露你的本地主机
如果你还没有这样做,打开一个新的终端窗口并运行 ngrok http 3000。复制 HTTPS 转发 URL。
测试你的 Webhook
- 返回 QuickNode 仪表板中的 webhook 页面。
- 将你的 ngrok URL (例如,
https://your-ngrok-id.ngrok.io/webhook) 粘贴到 Webhook URL 字段并保存。 - 现在,点击 发送示例 payload 按钮。QuickNode 将会发送一个示例 payload 到你正在运行的服务器。
- 检查你服务器的控制台日志,并检查你的 Telegram 频道是否有警报。
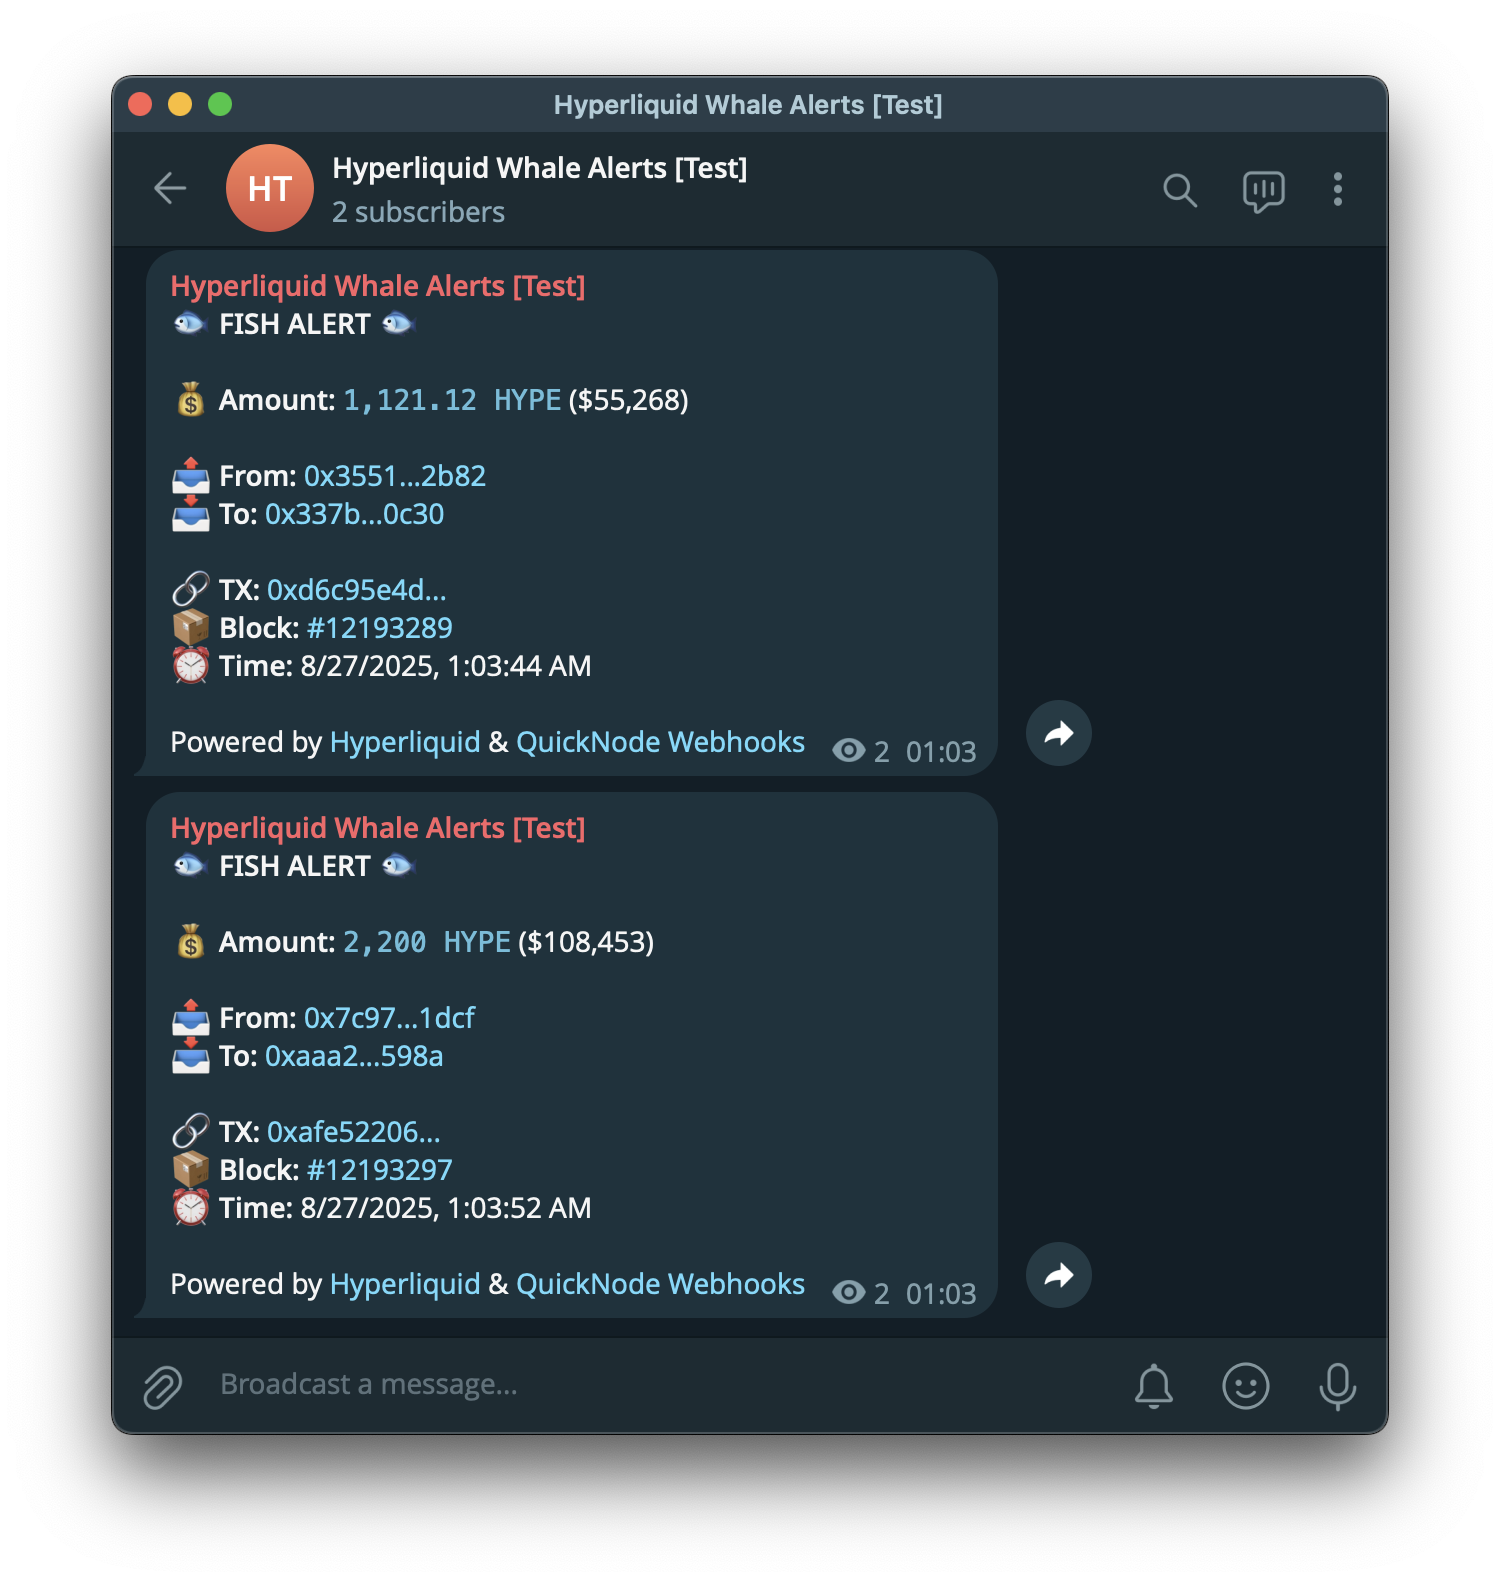
这是一个最终警报的示例:
激活你的 Webhook
一旦你确认一切正常,点击 创建一个 Webhook 按钮来创建你的 Webhook。你的机器人现在已经上线,并且会实时监控所有新的 HYPE 转账。
故障排除
有时,如果你的服务器或 ngrok 没有正确关闭,当你尝试重启它时,你可能会遇到像 地址已在使用中 这样的错误。这里是如何快速修复它。
第 1 步:释放端口
首先,使用端口找到进程 ID (PID),然后停止它。下面的命令适用于 macOS/Linux;它们可能因你的操作系统而异。
## 使用端口 3004 查找进程 ID (PID)
lsof -i :3004

## 将 <PID> 替换为你找到的数字并运行:
kill -9 <PID>
第 2 步:重启和更新
重启你的服务器和 ngrok。重要提示:ngrok 每次启动时都会创建一个新的 URL。你必须复制这个新的 URL 并将其更新到你的 QuickNode webhook 设置中。
结论
恭喜你!你已经成功构建了一个生产级别的,实时的 Hyperliquid 区块链巨鲸警报系统。通过结合 QuickNode Webhooks 在链上数据的强大功能,一个用于业务逻辑的安全 Node.js 服务器,和用于通知的 Telegram API,你已经创建了一个用于监控 DeFi 生态系统的有价值的工具。
这种模式是灵活的,你可以扩展层级,用额外的链上上下文来丰富它,或者随着你的用例进化而交换数据源和目的地。
下一步:生产部署
虽然 ngrok 非常适合开发,但你将需要一个更持久的解决方案来用于生产环境。考虑将你的应用程序部署到:
- 一个虚拟专用服务器(VPS),如 DigitalOcean 或 AWS,使用像 PM2 这样的进程管理器来保持它的运行。
- 一个使用 Docker 的容器化服务。
- 一个平台即服务(PaaS),如 Heroku 或 Render。
- QuickNode Functions,它是一个无服务器,事件驱动的平台。你可以将服务器逻辑改编成一个 Function,这是一个低维护的适合处理 webhook payload 的方法。
可能的改进
这个项目提供了一个你可以扩展的坚实基础。这里有一些想法可以将你的机器人提升到一个新的水平:
-
多代币支持:修改代码以接受代币地址的数组。这样,你可以用不同的阈值监控多个代币,并相应地发送警报。
-
历史数据仪表板:将传入的转账数据存储在一个数据库中(例如,PostgreSQL,MongoDB)。然后,你可以构建一个基于 Web 的 dApp 来可视化历史趋势,跟踪特定巨鲸钱包的净流量,并执行更深入的链上分析。对于历史数据,可以考虑使用 QuickNode Streams,因为它支持回填。
-
添加更多通知渠道:集成其他通知服务,如 Discord webhooks。
-
自动交易触发器:对于更高级的用例,你可以使用这些警报来触发链上操作。例如,一个大的转账可能会触发一个交换。
更多资源
- Hyperliquid 文档
- QuickNode Hyperliquid 指南
- QuickNode Hyperliquid 文档
- 视频:什么是 Hyperliquid HyperEVM 以及如何入门
- 视频:如何构建一个 Hyperliquid 分析仪表板
如果你遇到困难或有疑问,请在我们的 Discord 中提出。关注我们的 X (前身为 Twitter) (@QuickNode) 或我们的 Telegram 公告频道 ,及时了解最新信息。
我们 ❤️ 反馈!
如果你对新主题有任何反馈或要求,请告诉我们。我们很乐意听取你的意见。
- 原文链接: quicknode.com/guides/oth...
- 登链社区 AI 助手,为大家转译优秀英文文章,如有翻译不通的地方,还请包涵~
- 翻译
- 学分: 54
- 分类: DeFi
- 标签: QuickNode Webhooks Hyperliquid HYPE 代币 巨鲸预警机器人 Telegram 机器人 HyperCore


